I bought my 1965 1200 A Beetle from the first owner 1991. The ruby red Standard Beetle had 40.000 kilometer run, a Saxomat clutch and was in very good condition.
After I had the car it was painted black, because I did not like red at that time. I also installed chrome pumpers and chrome hubcaps.
From 1992-2000 the Beetle was my daily driver and I drove about 80000 kilometer with it. After that, the beetle was very rusty and a quick TUV repair was not possible. I bought a 1983 beetle and put my 1200 A in a garage for 10 years.
The body off restoration of my VW Beetle started with disassembling and the welding was finished by the end of 2011. After welding the beetle was sandblasted, painted and assembled in 2012.
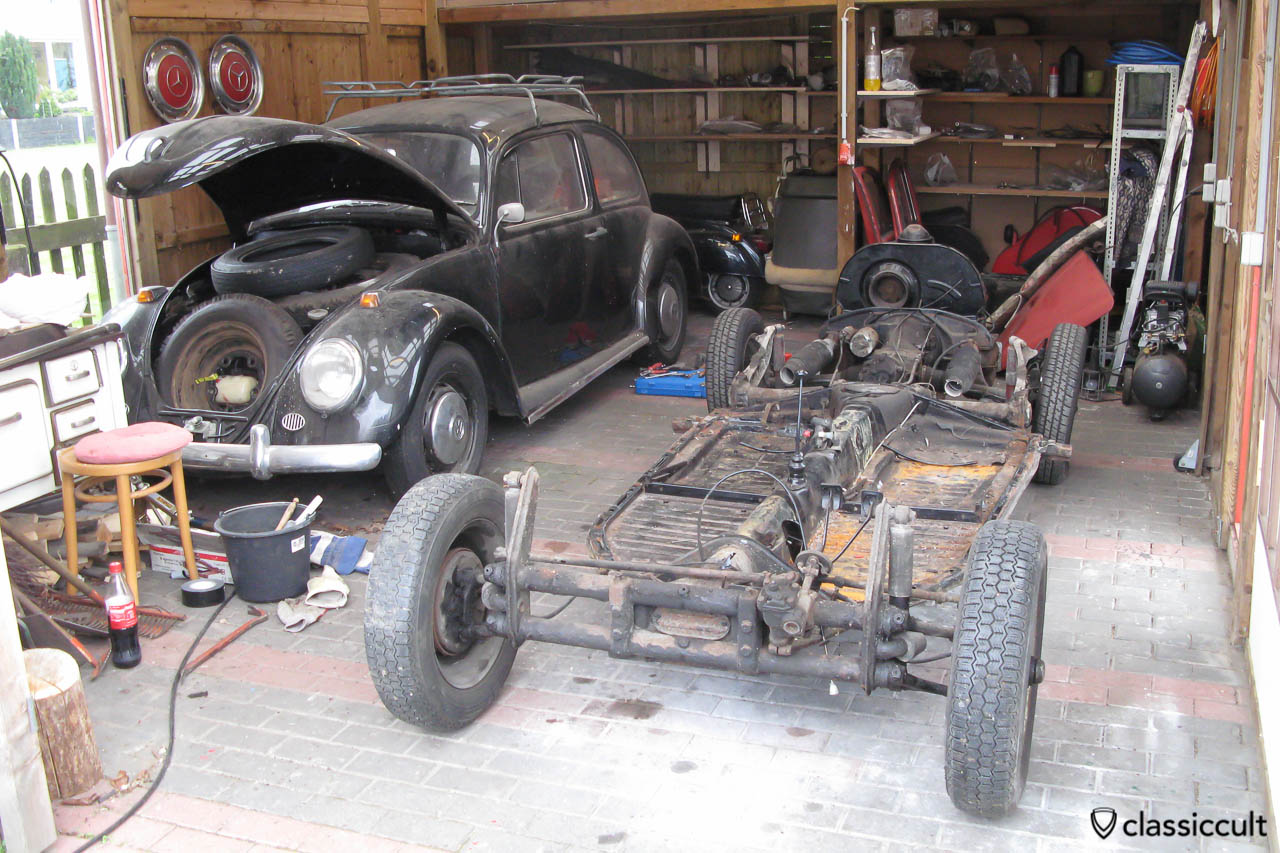
The first pic shows my 1965 VW 1200 A Standard Beetle before restoration. The black bug is my 1200A which I have since 1991. That’s the beetle which I restored. The second ruby red 1200A is for spare parts.
Below are pictures and information of my 1965 1200 A VW Beetle restoration:
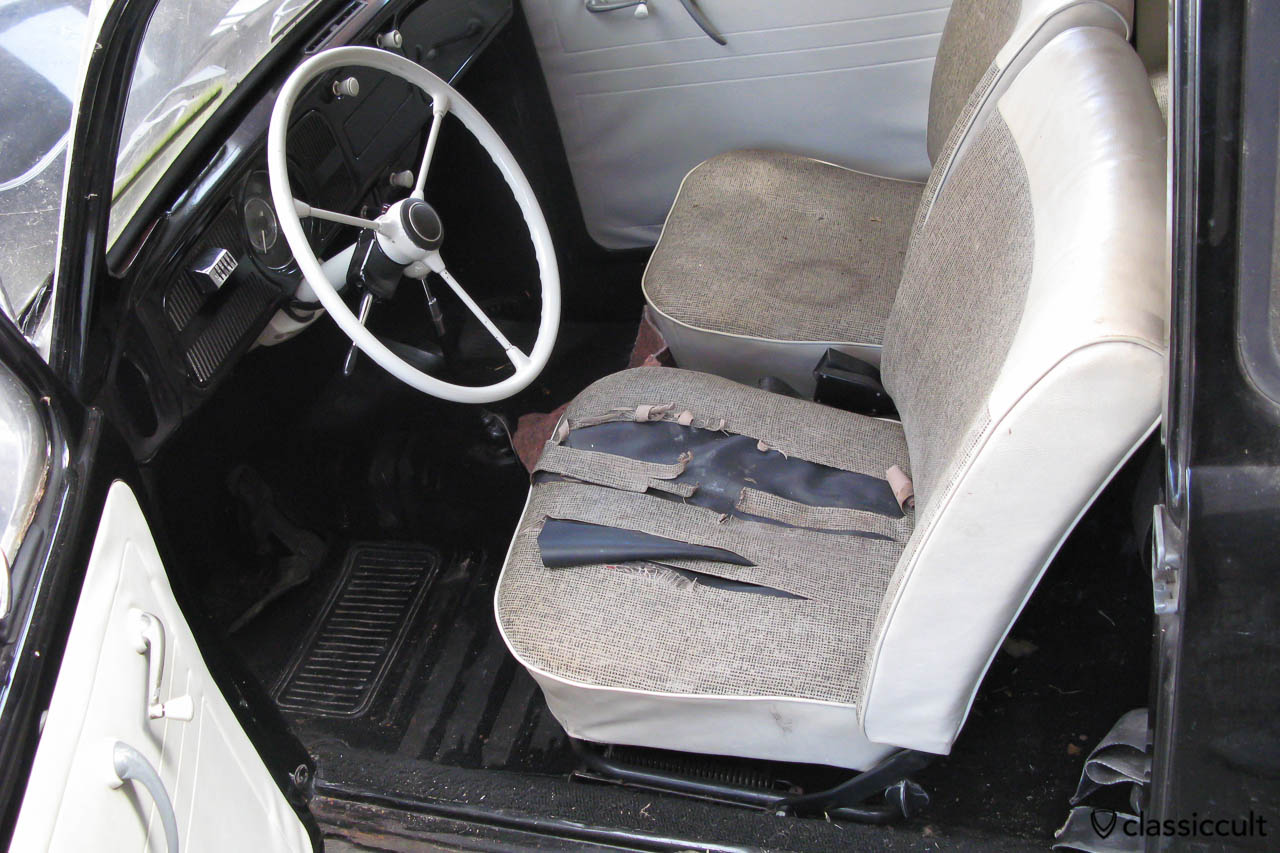
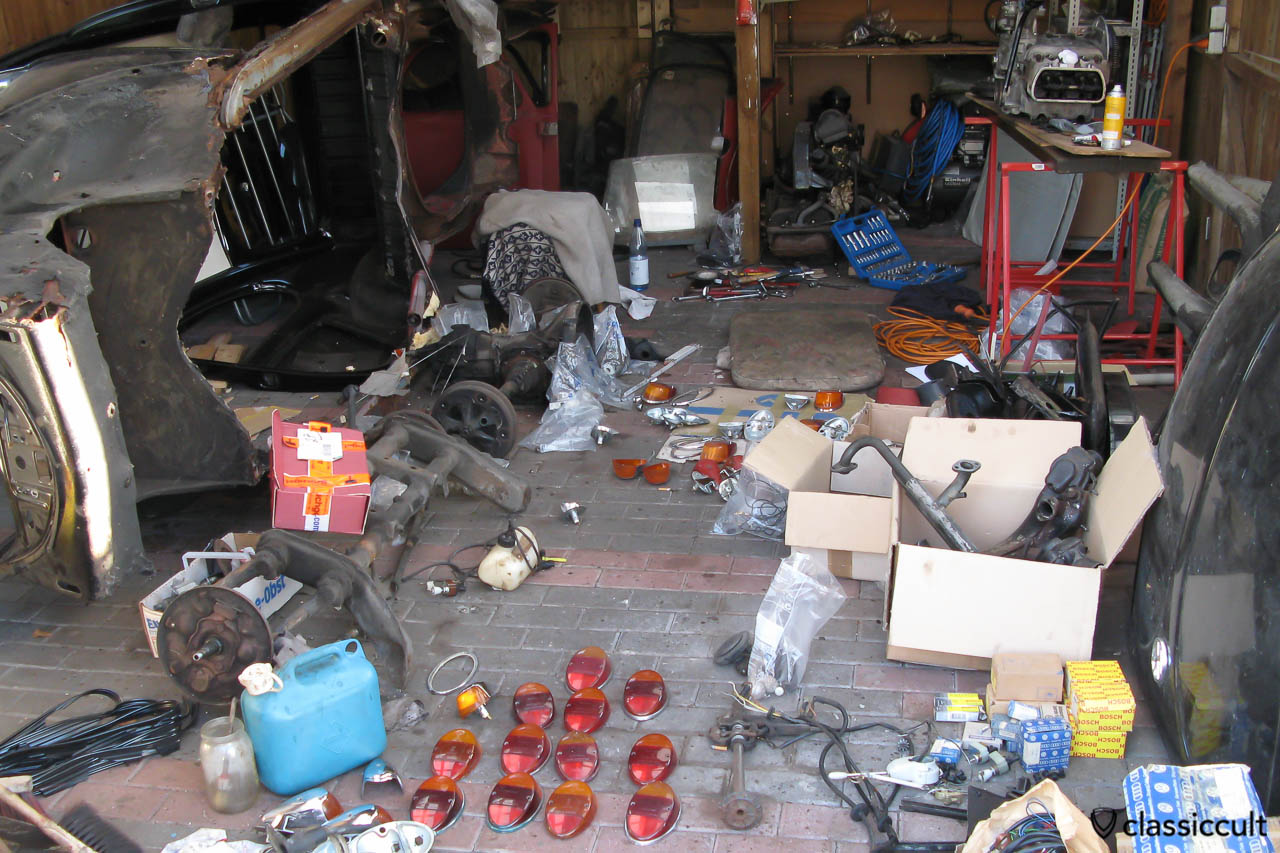
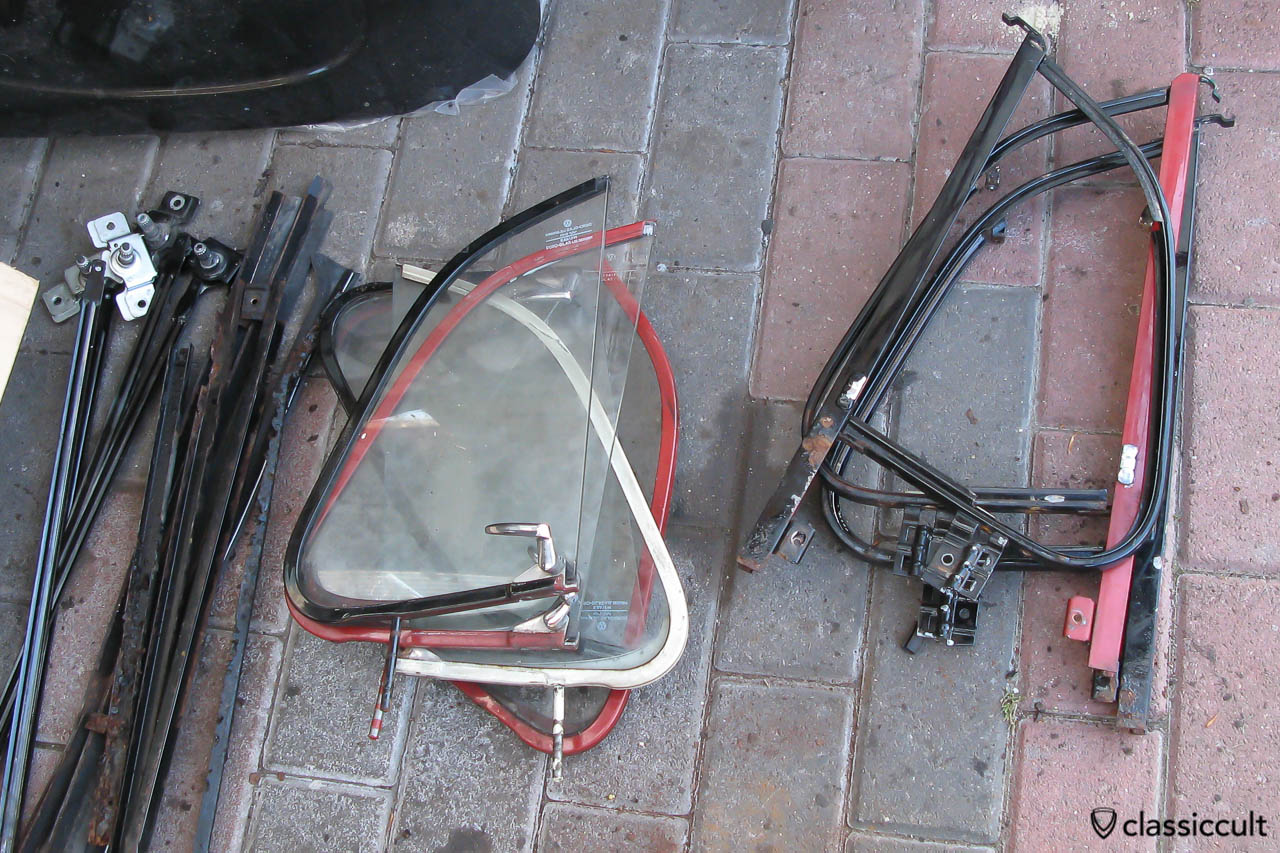
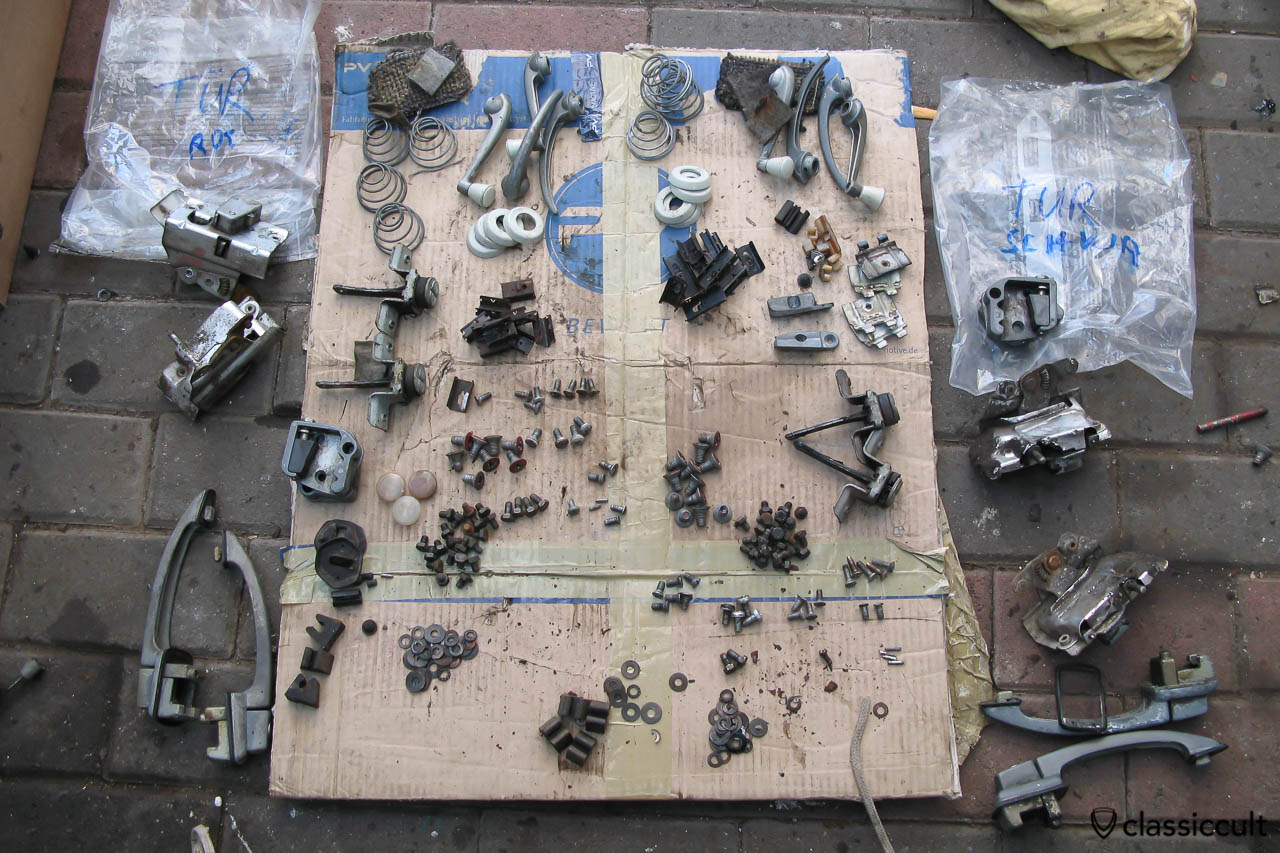
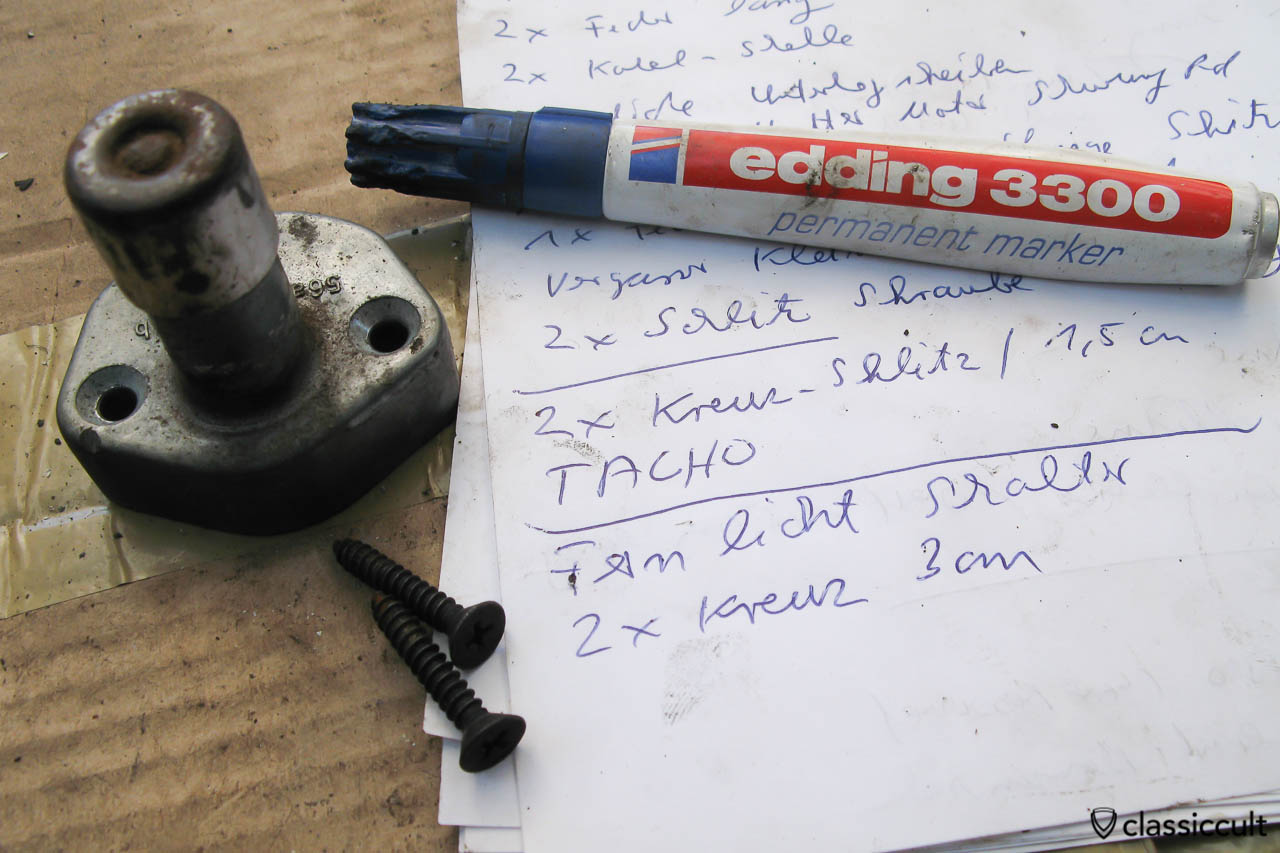
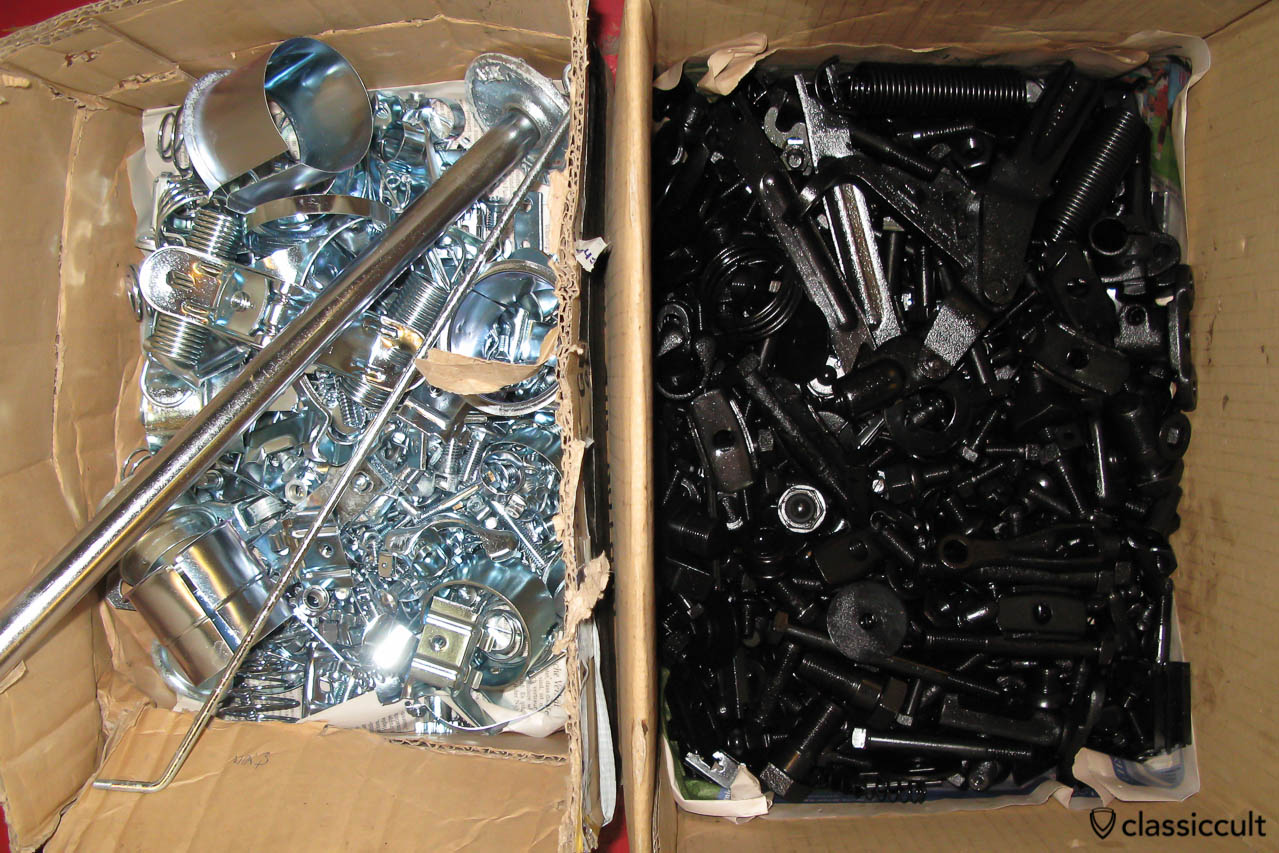
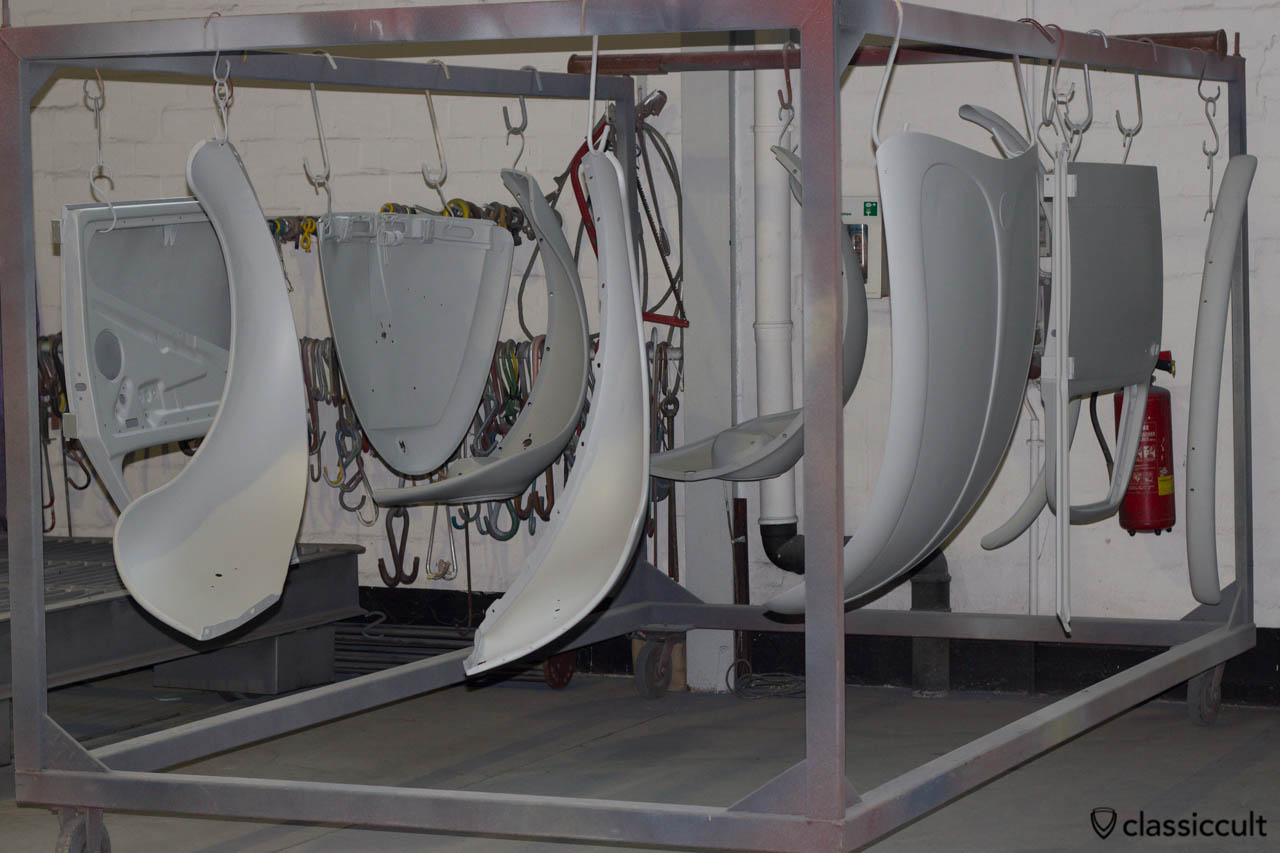
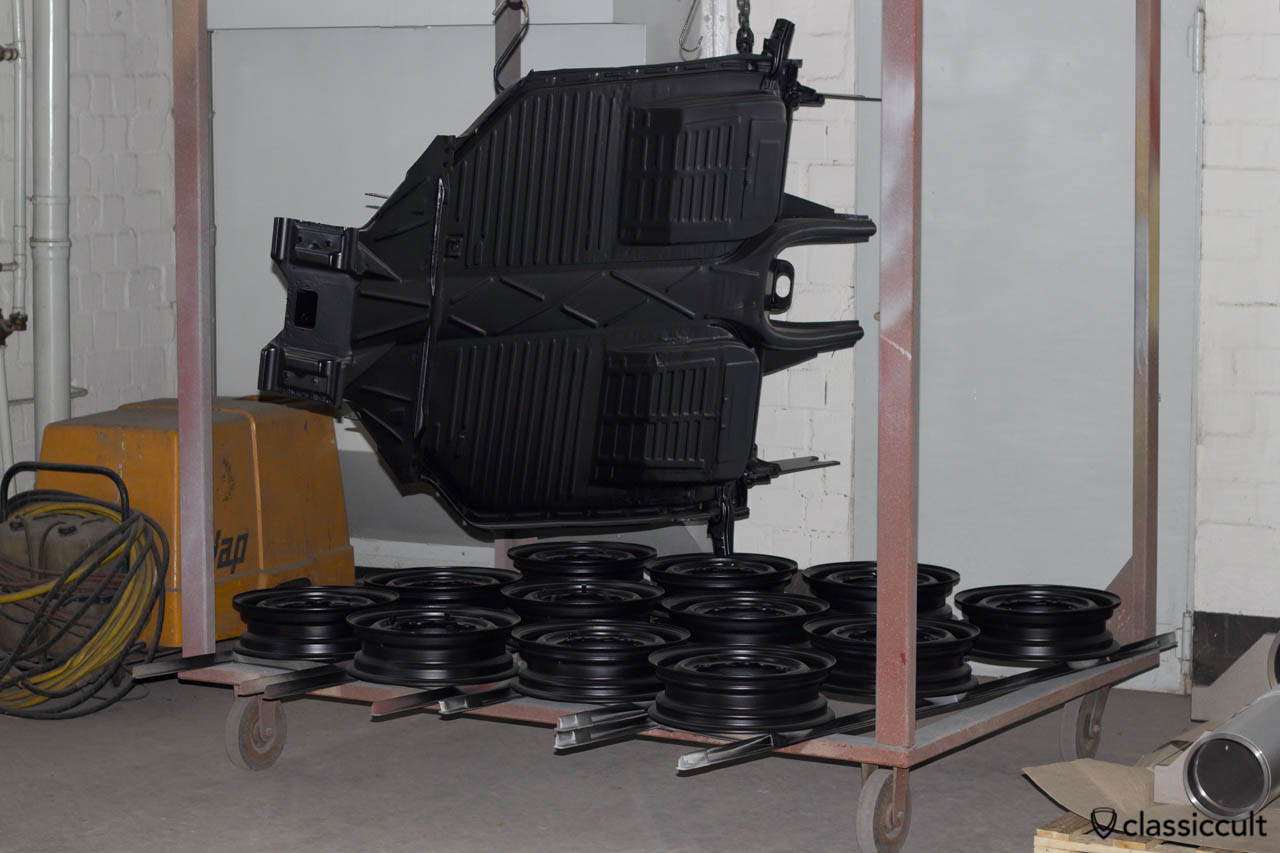
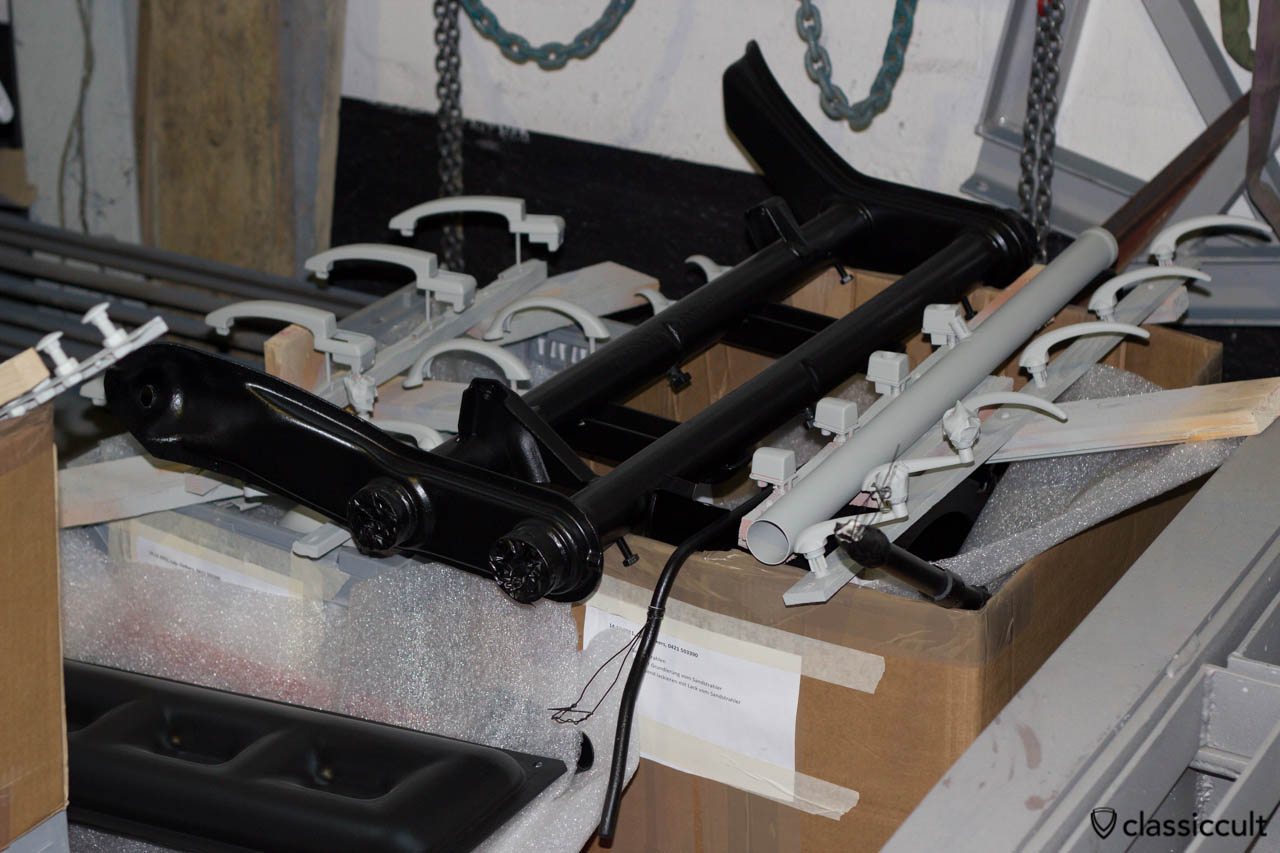
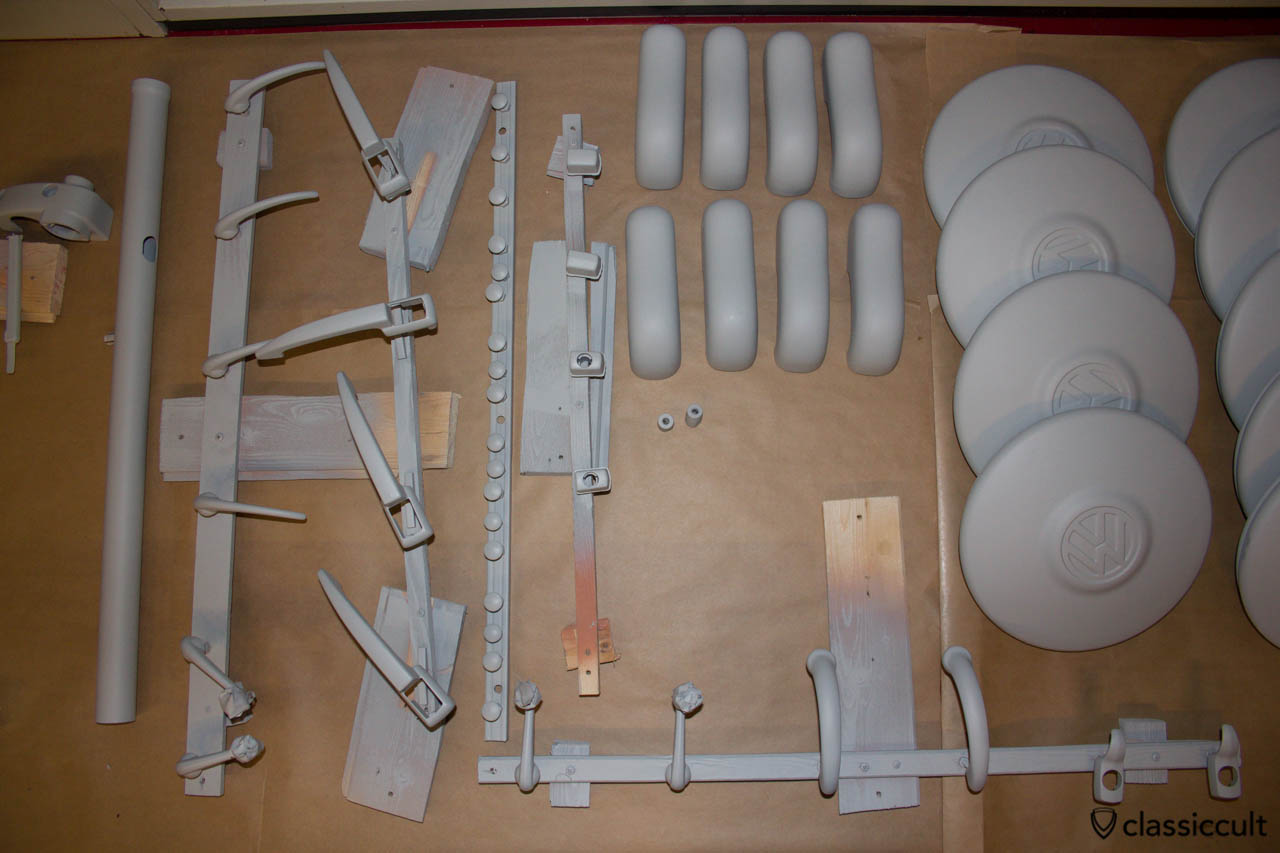
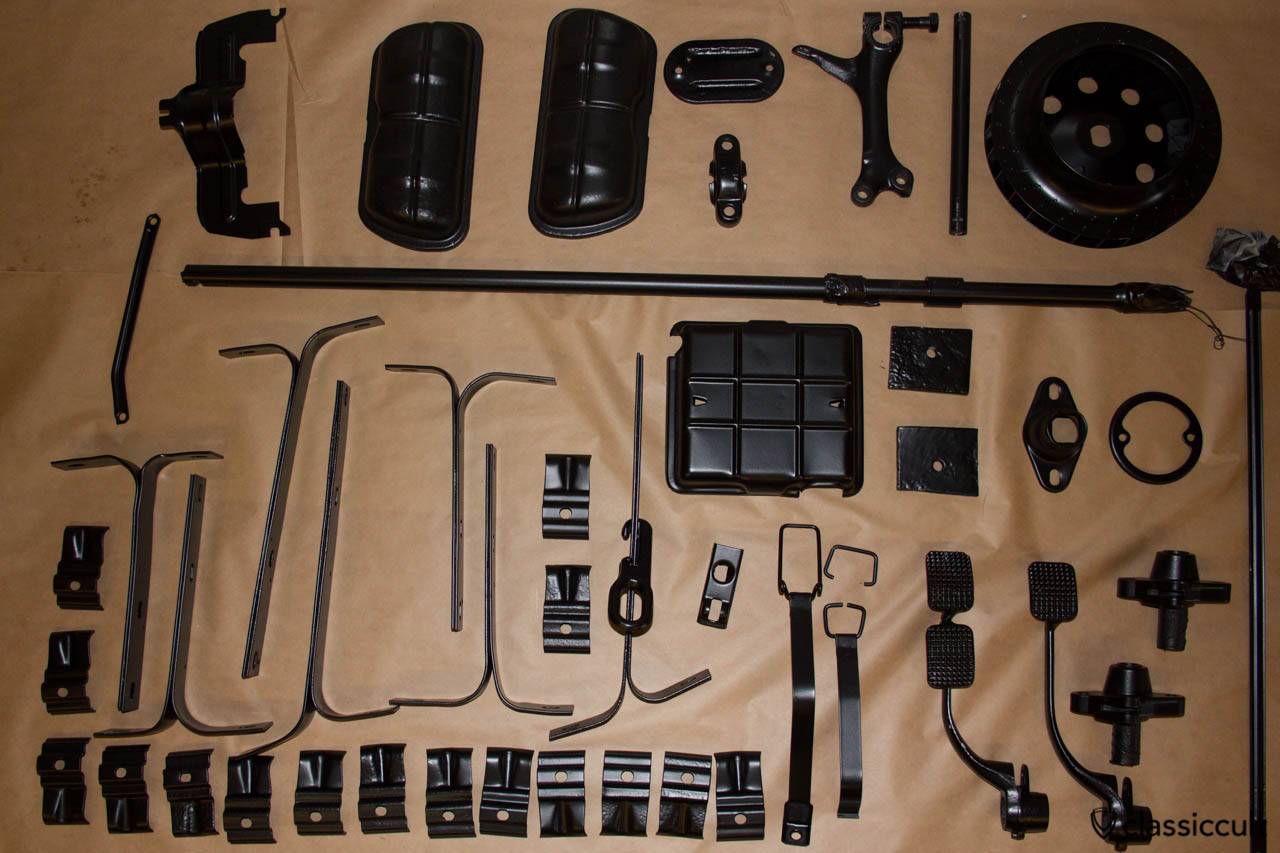
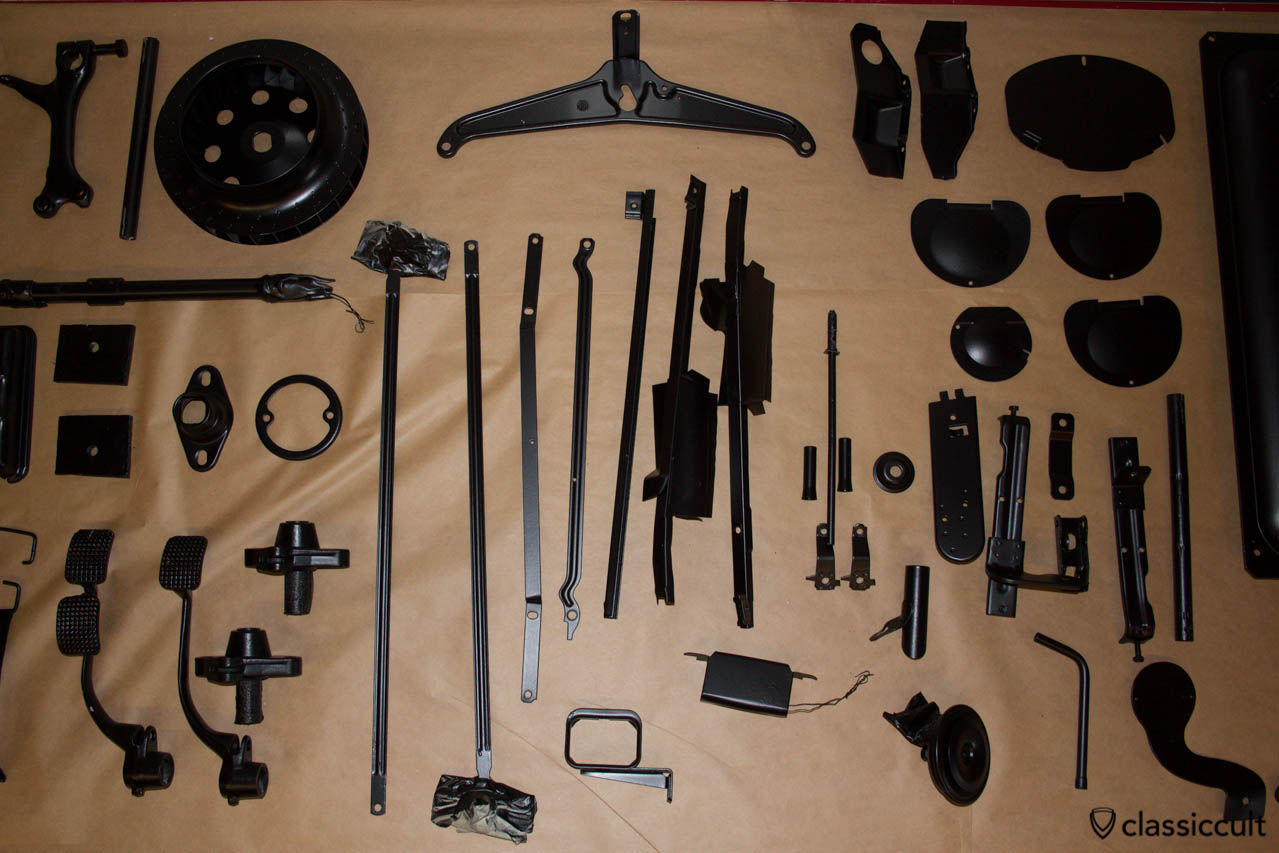
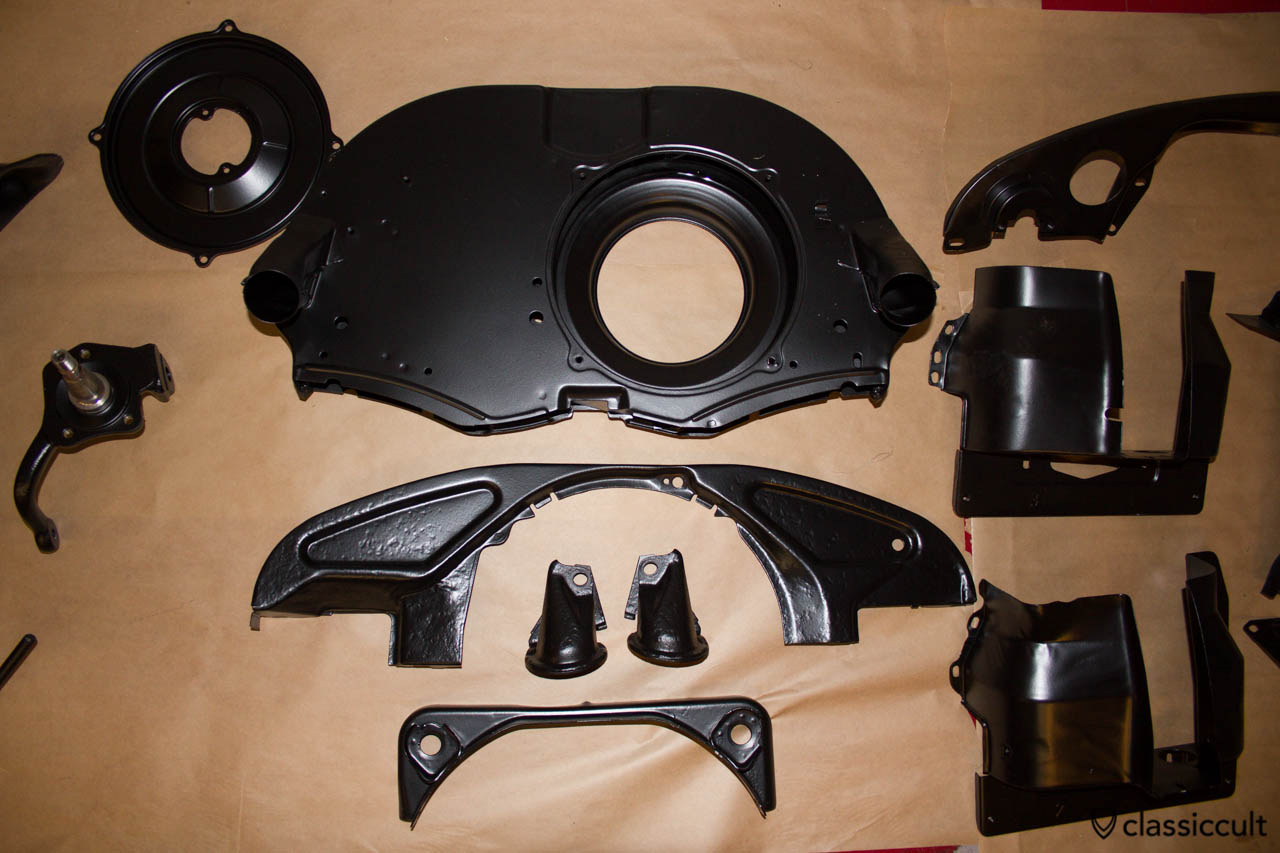
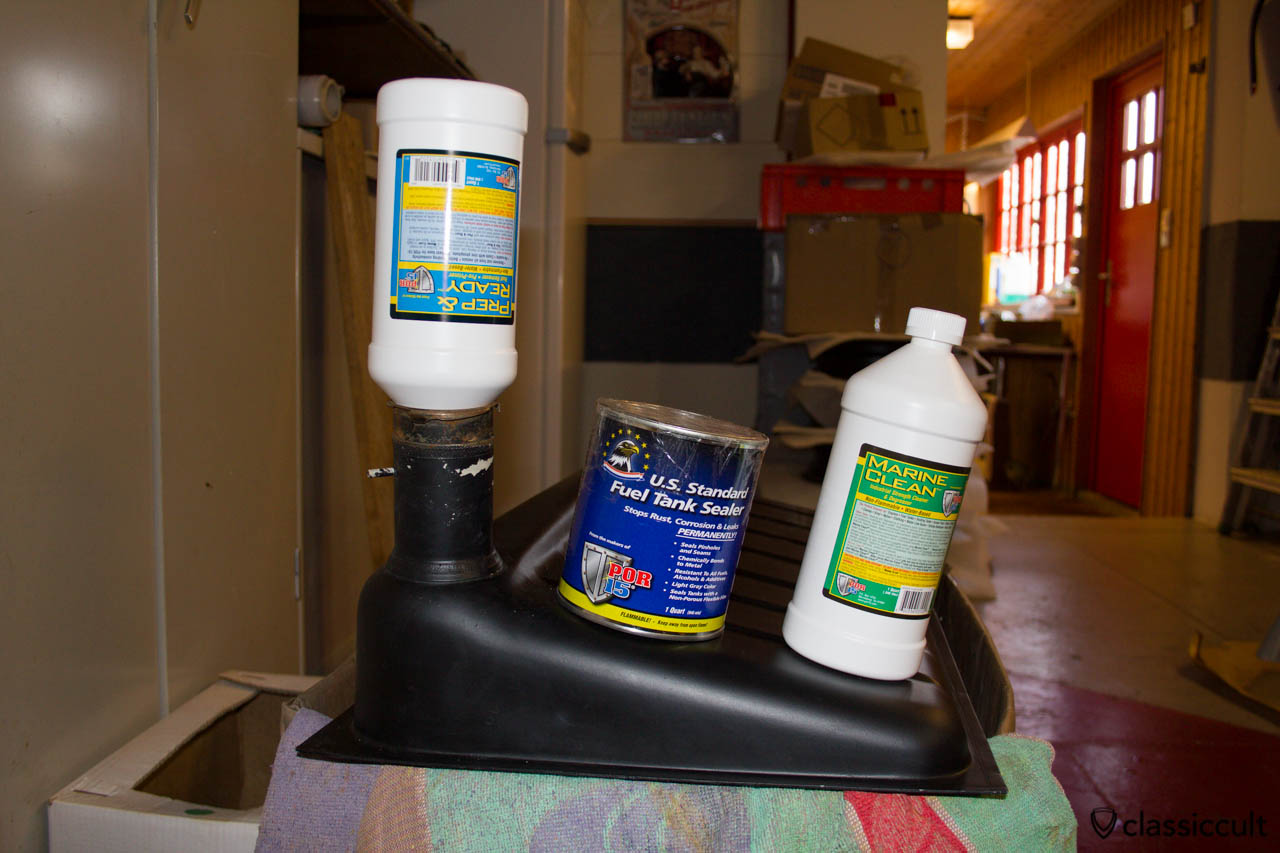
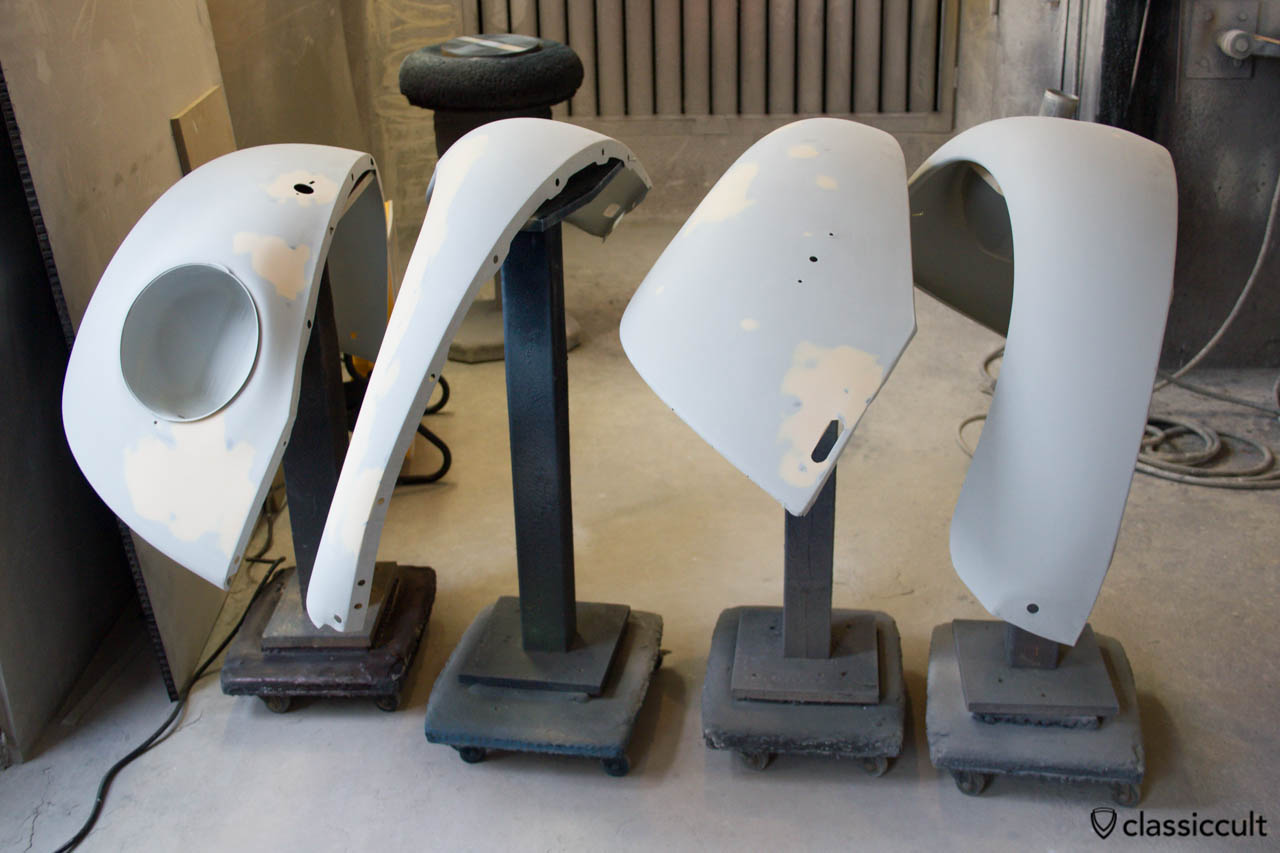
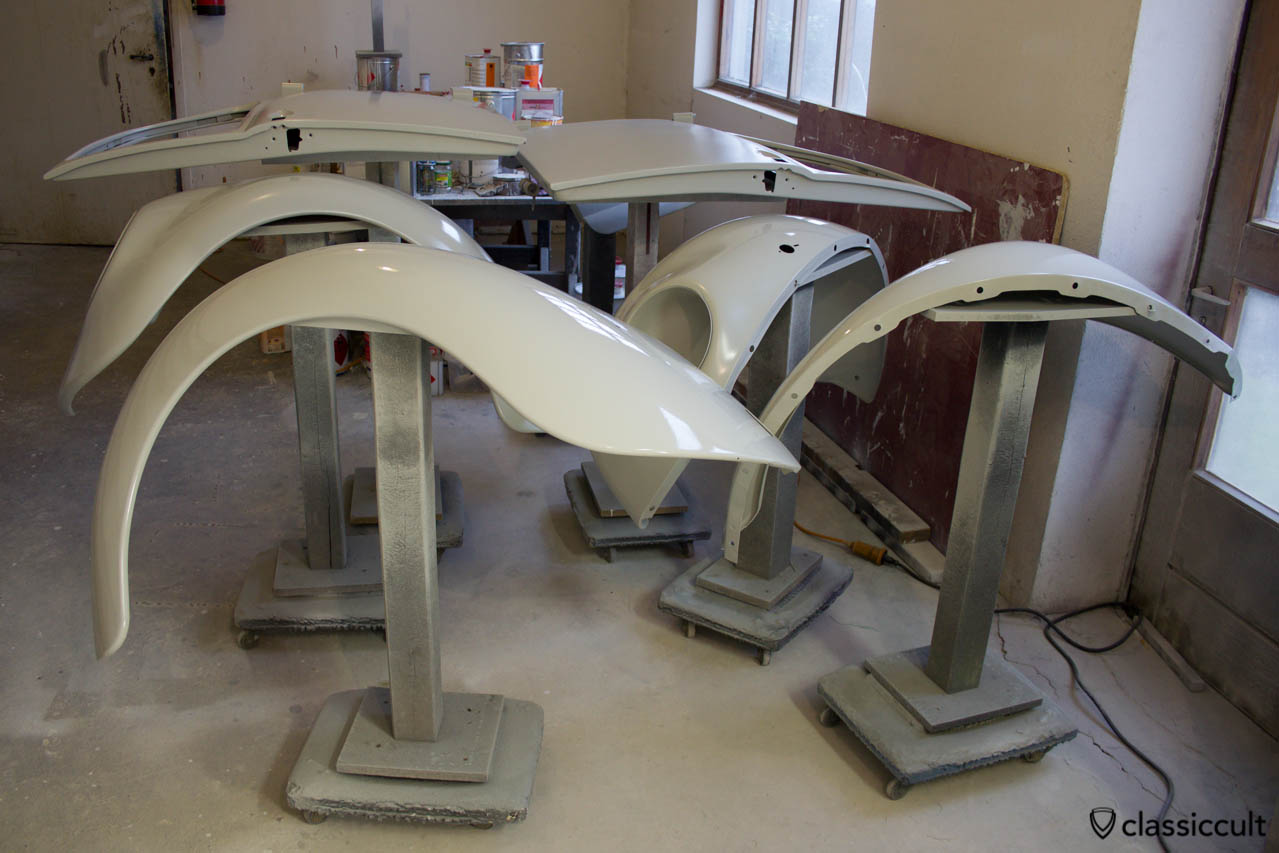
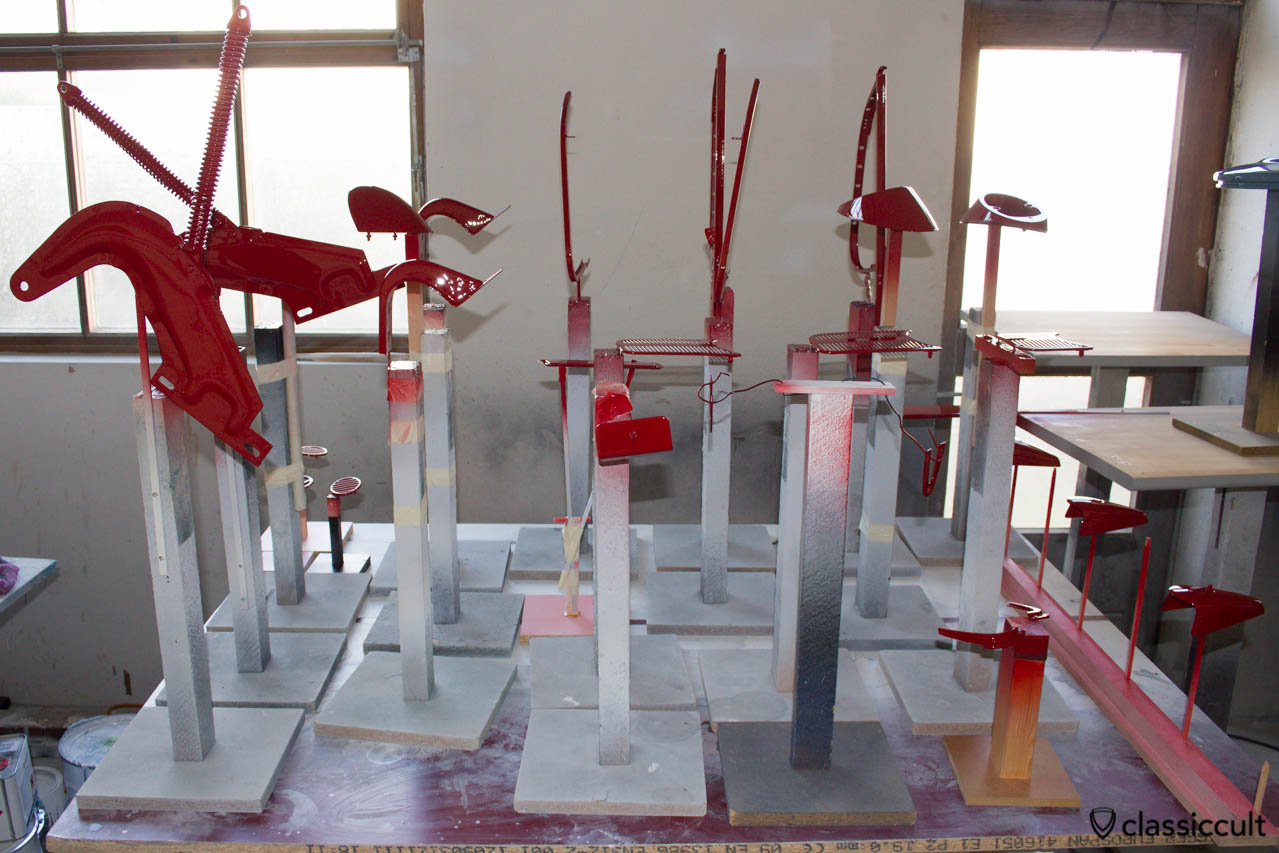
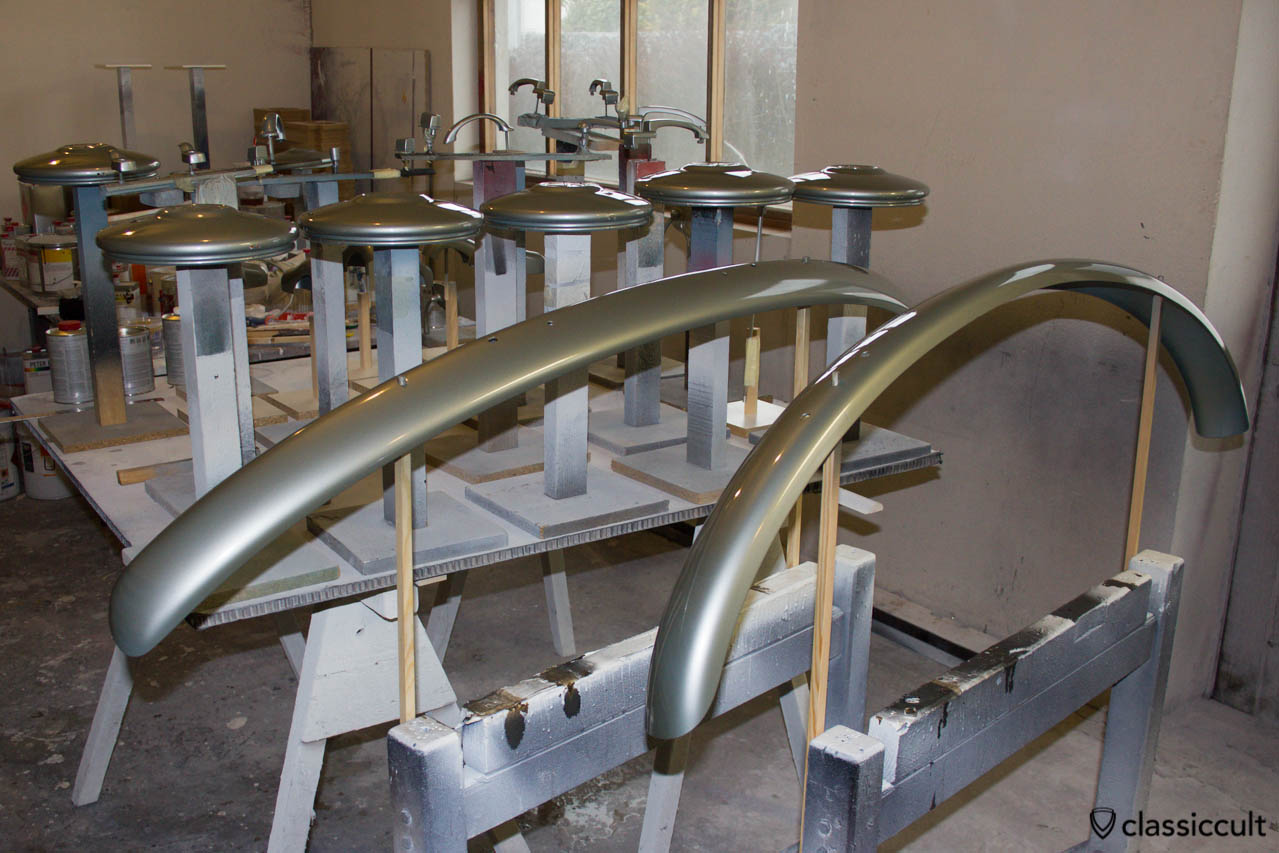
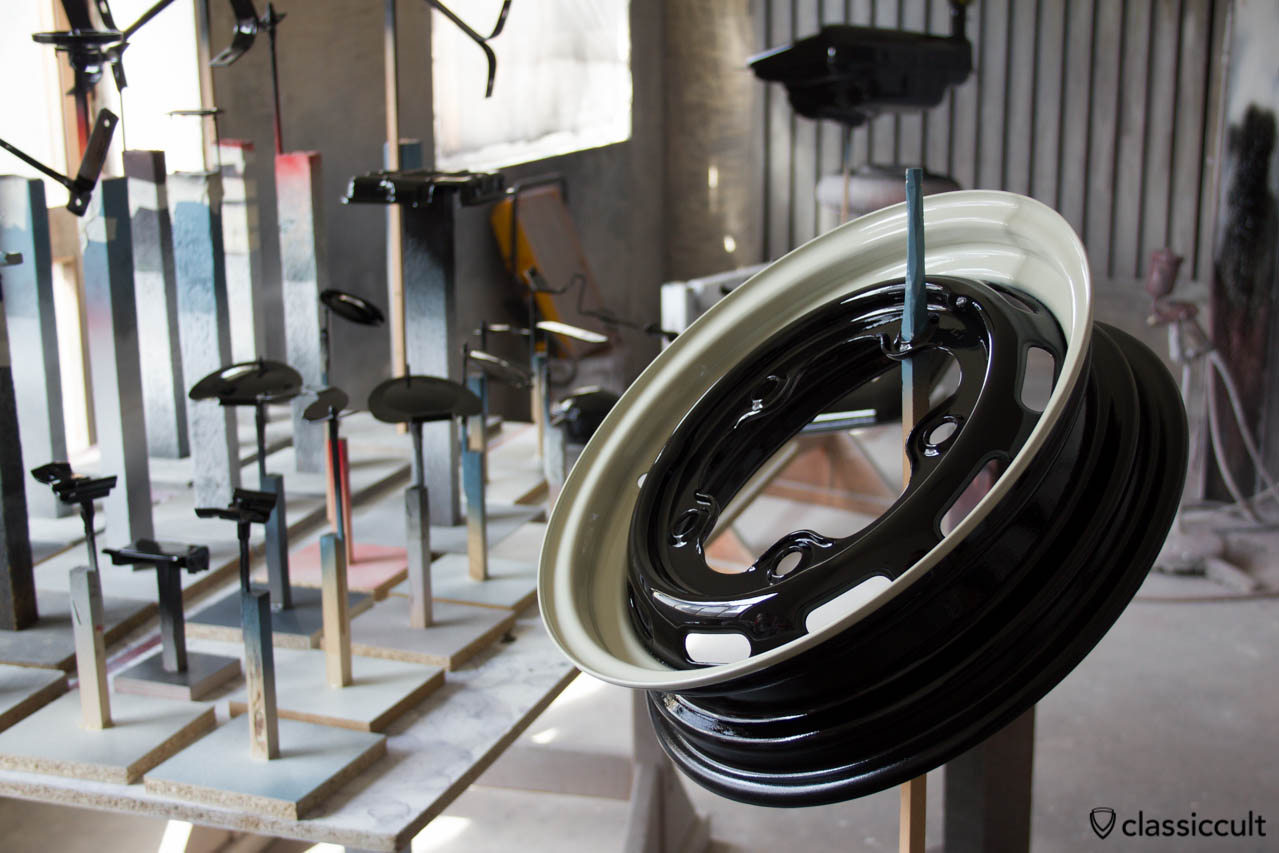
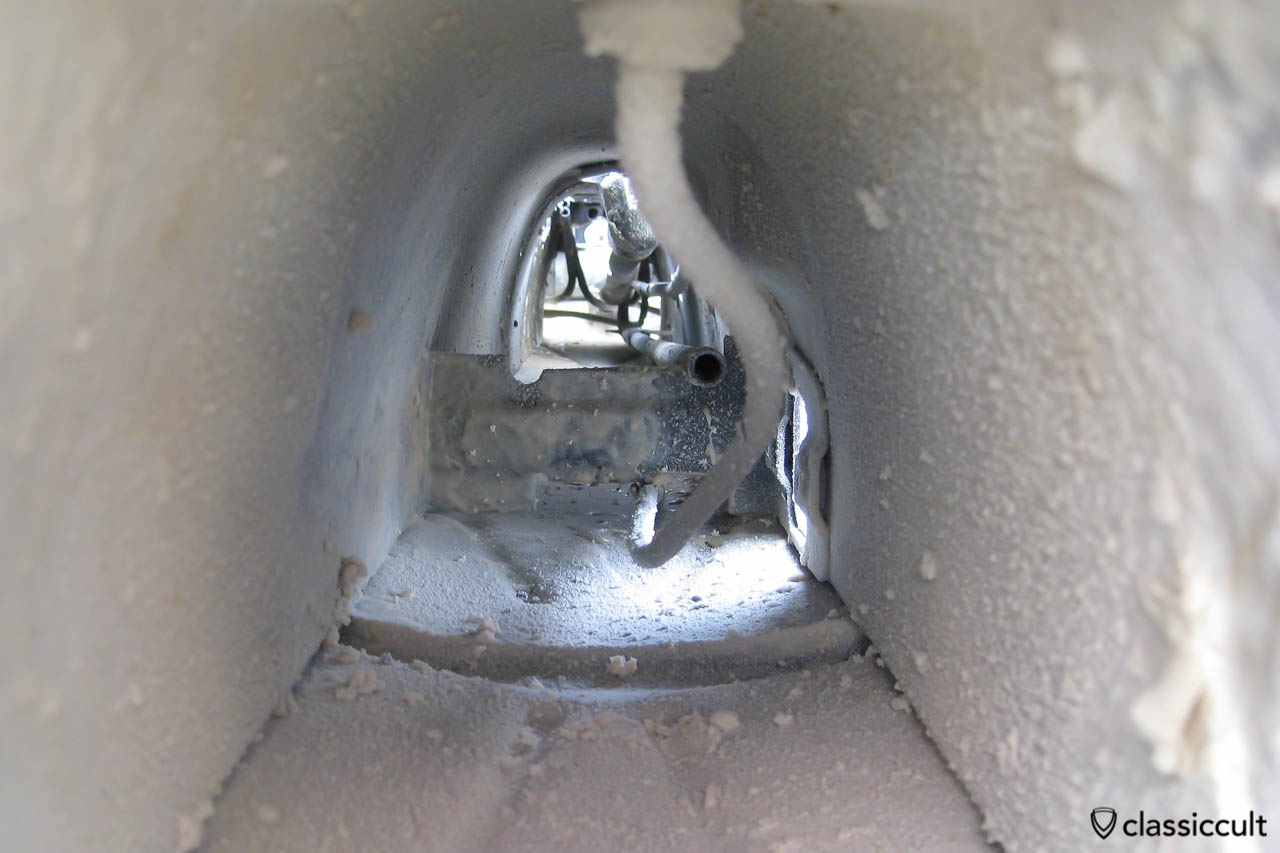
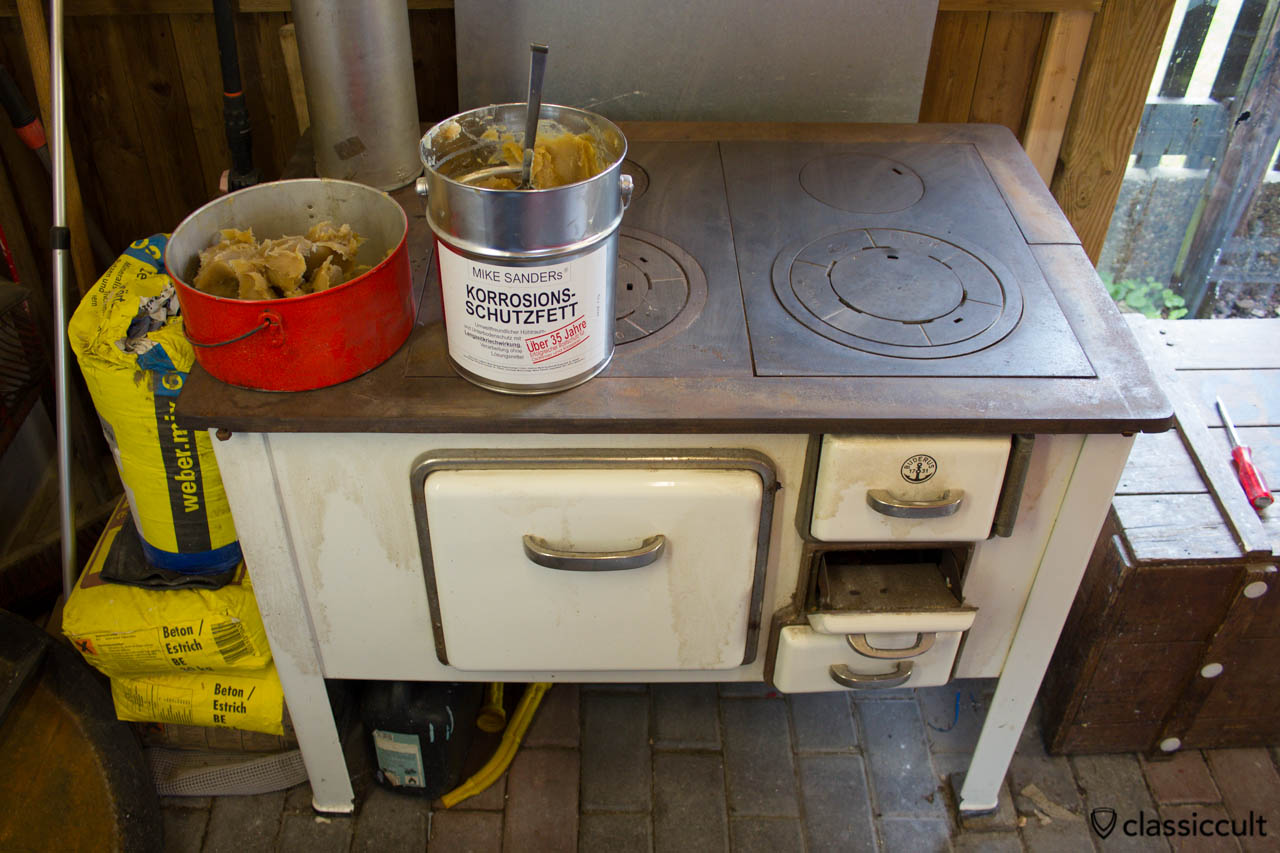
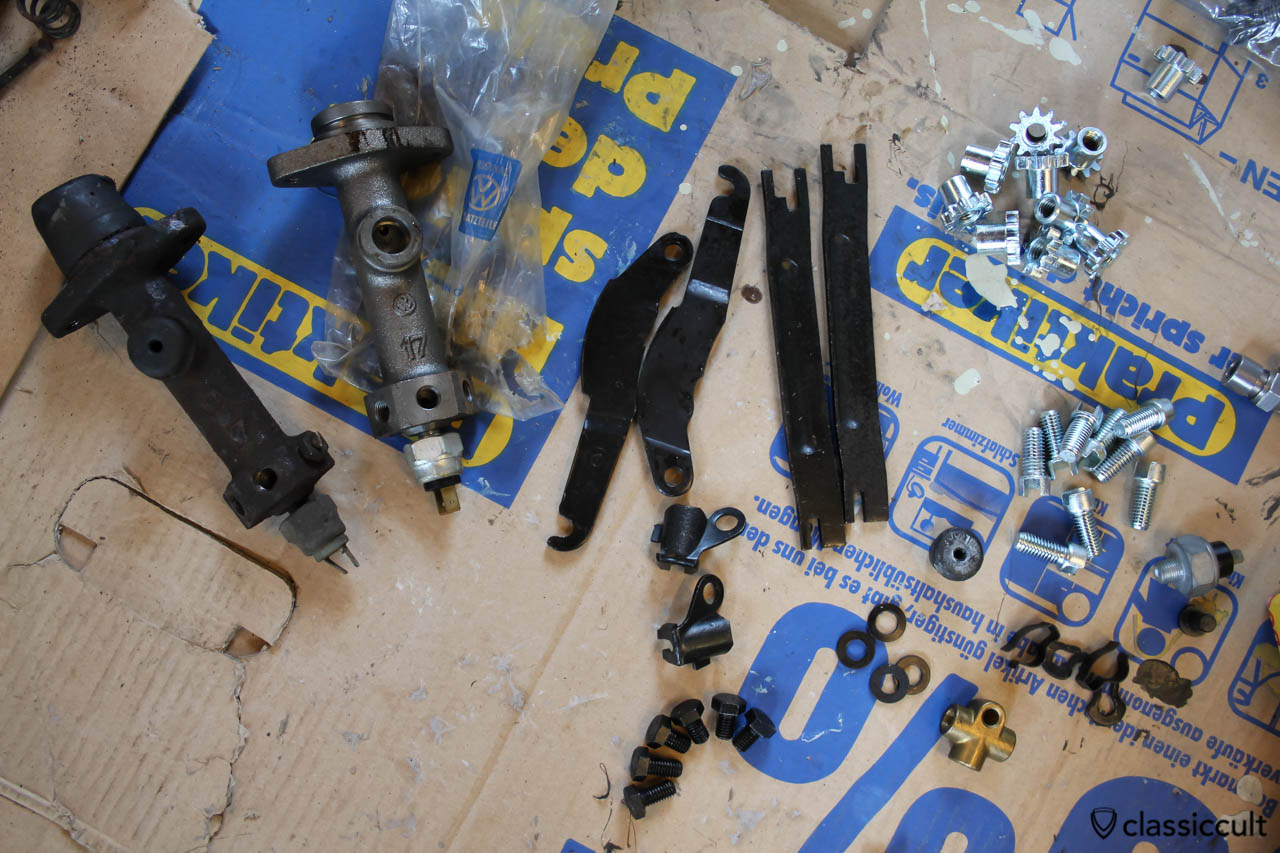
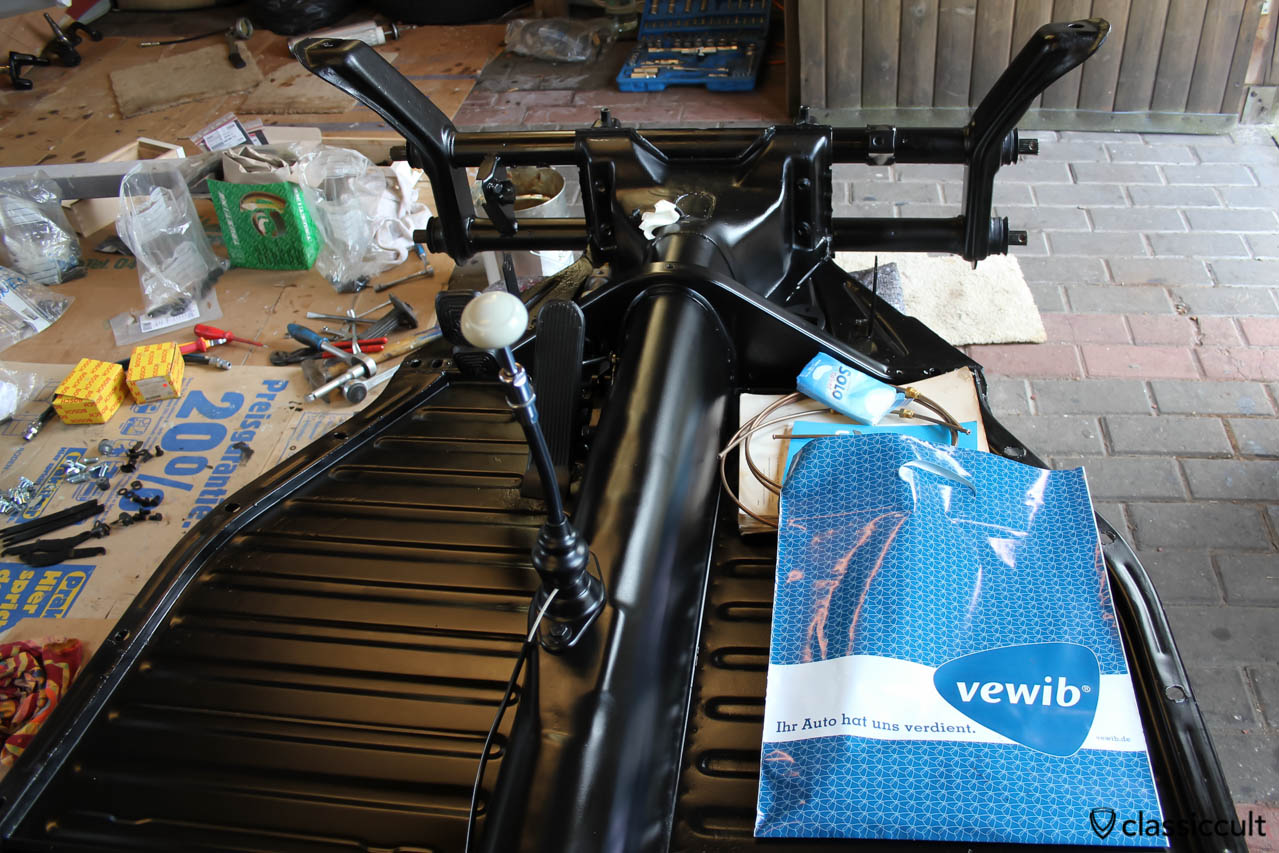
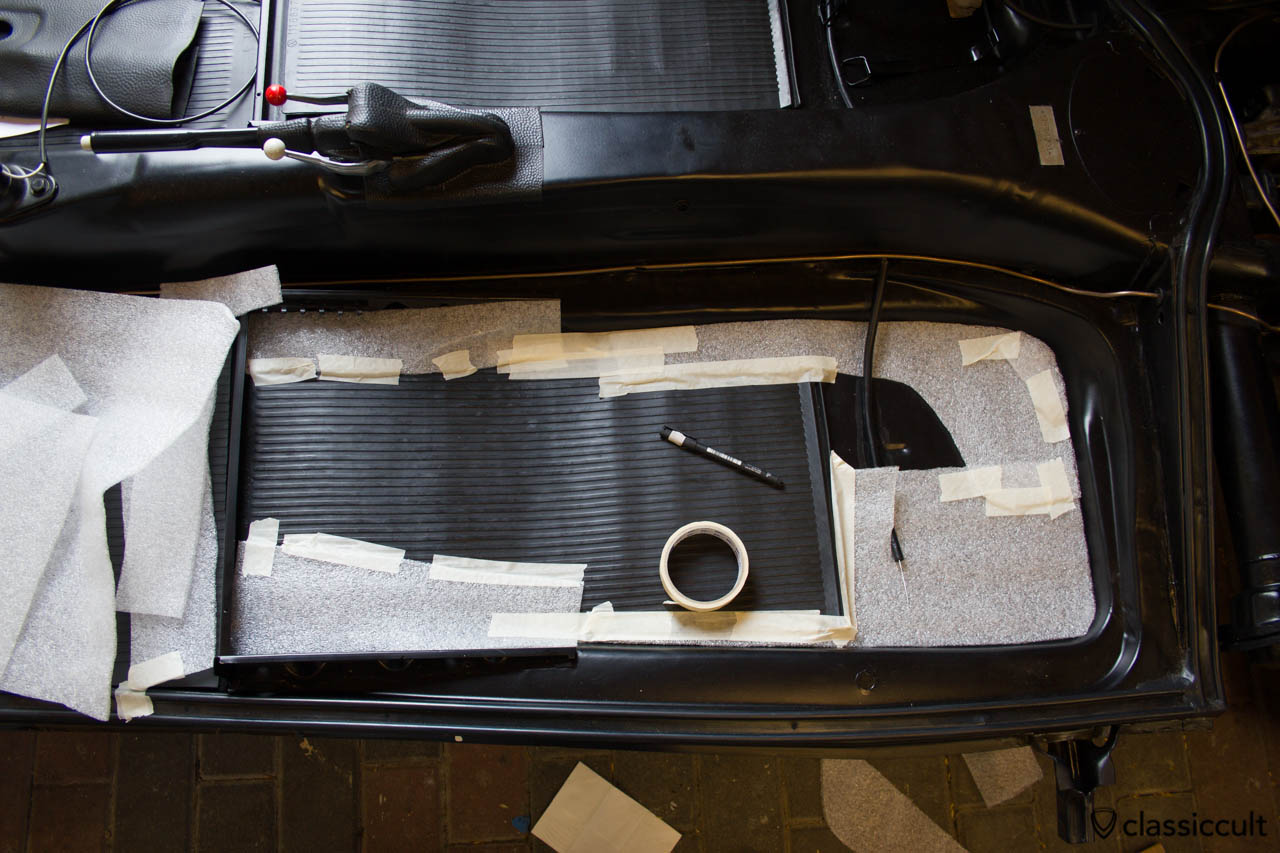
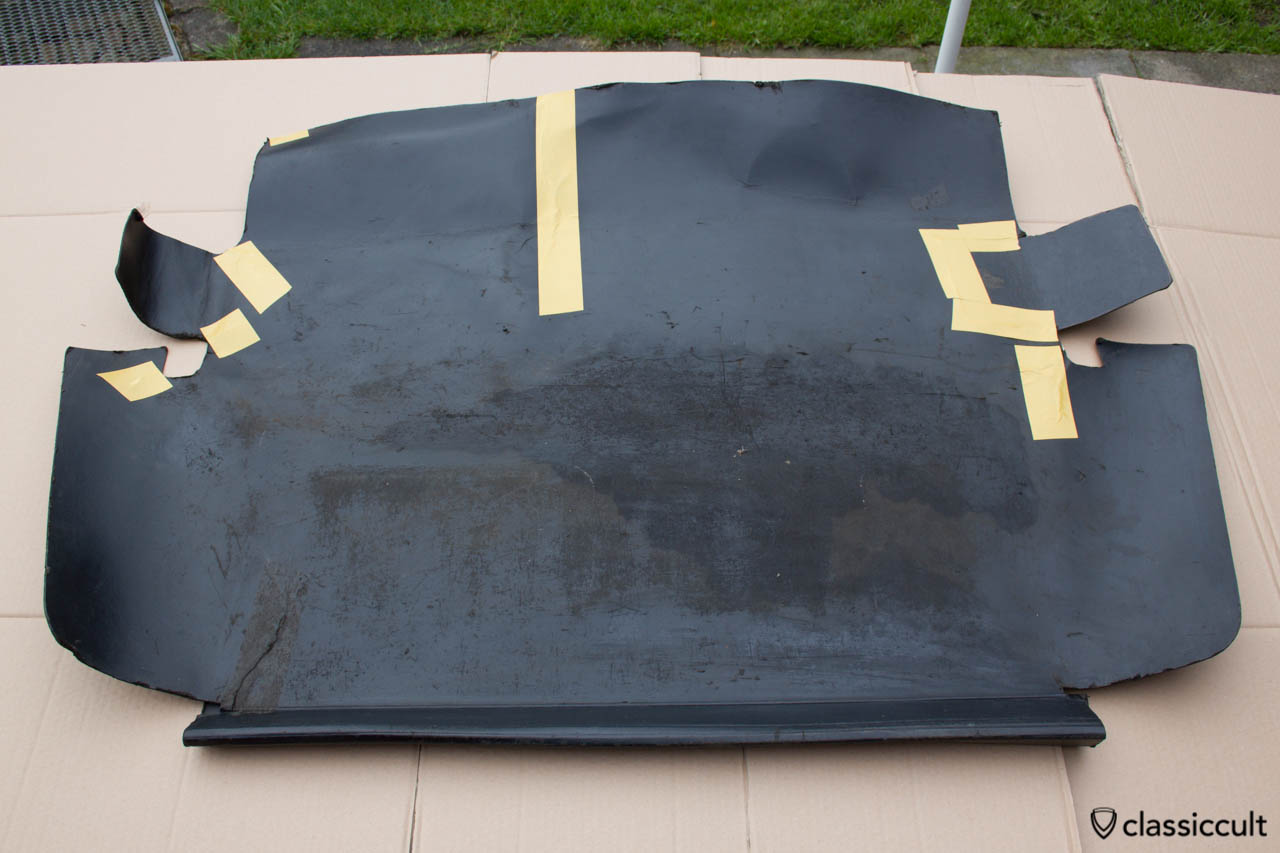
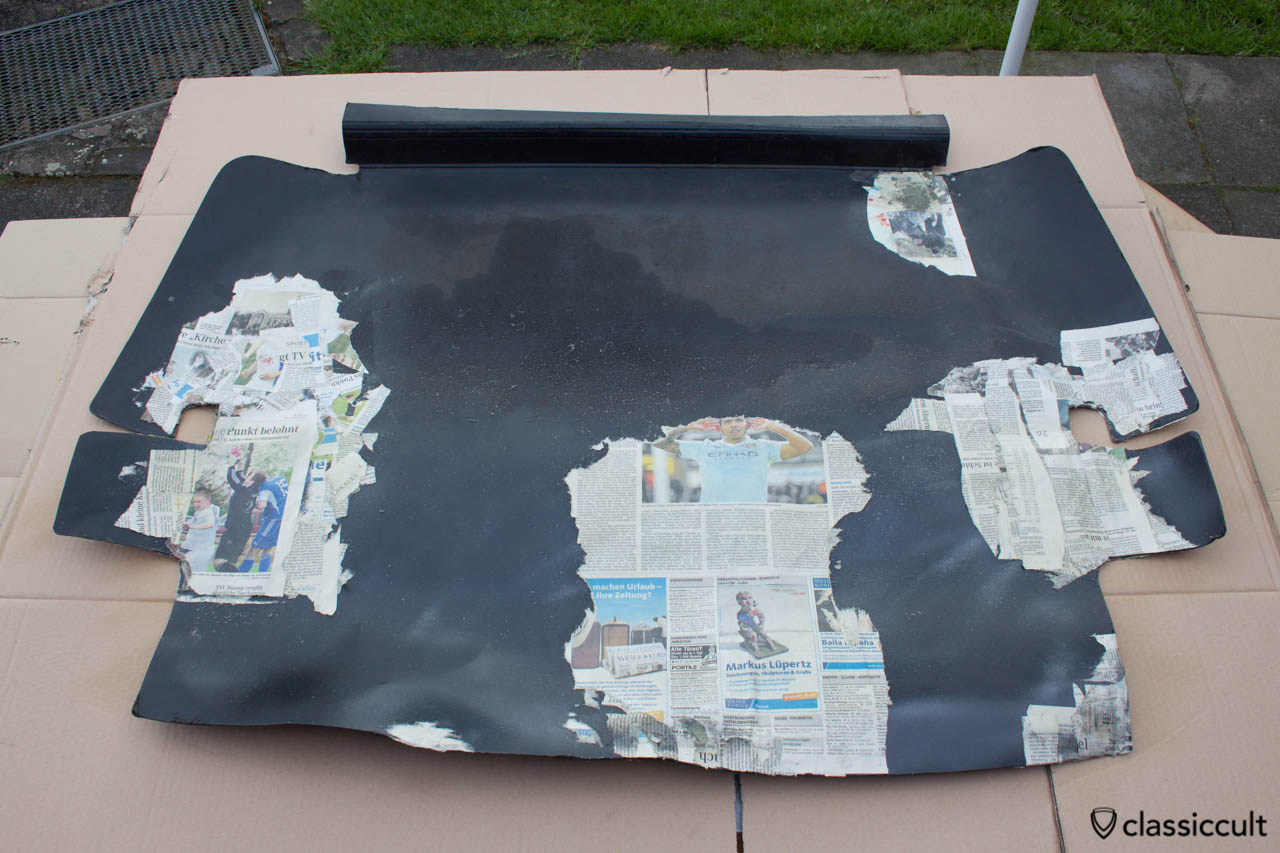
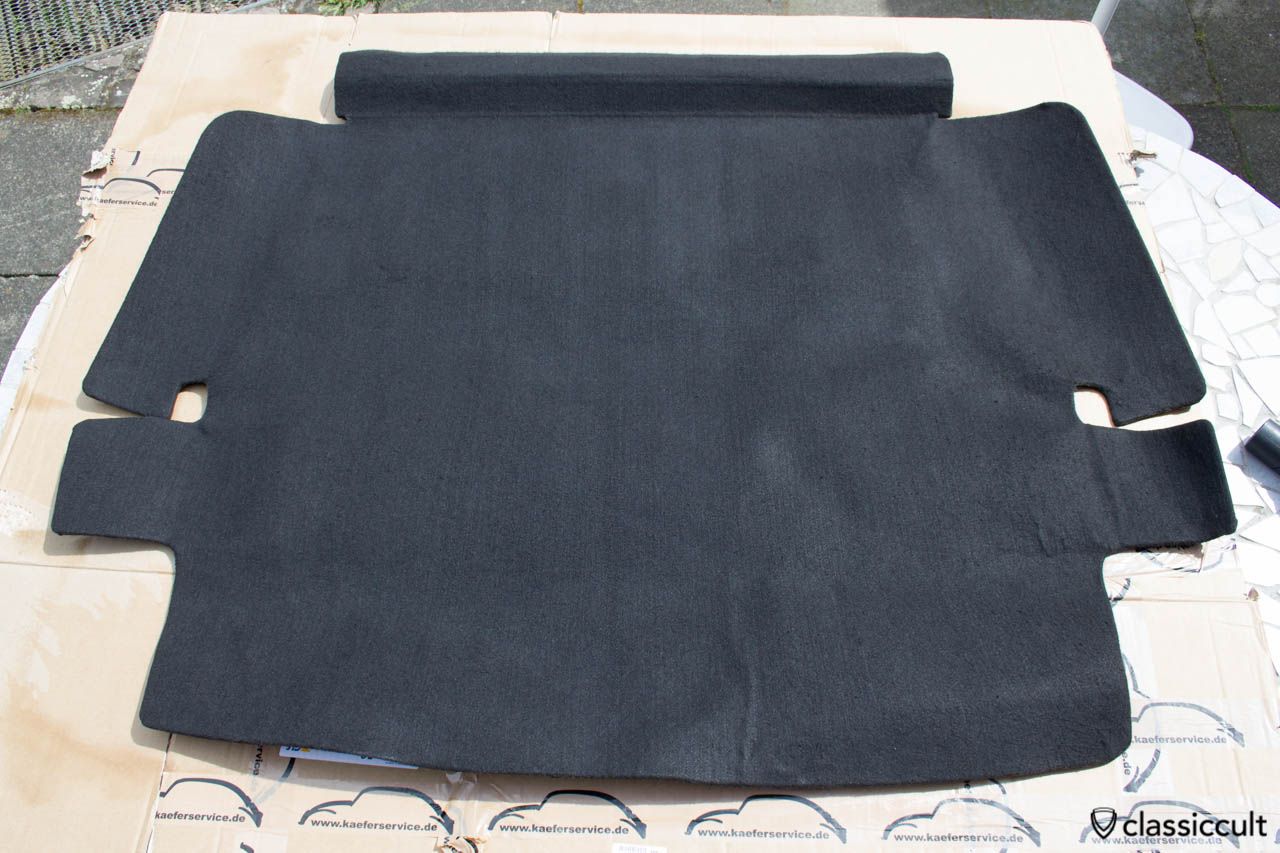
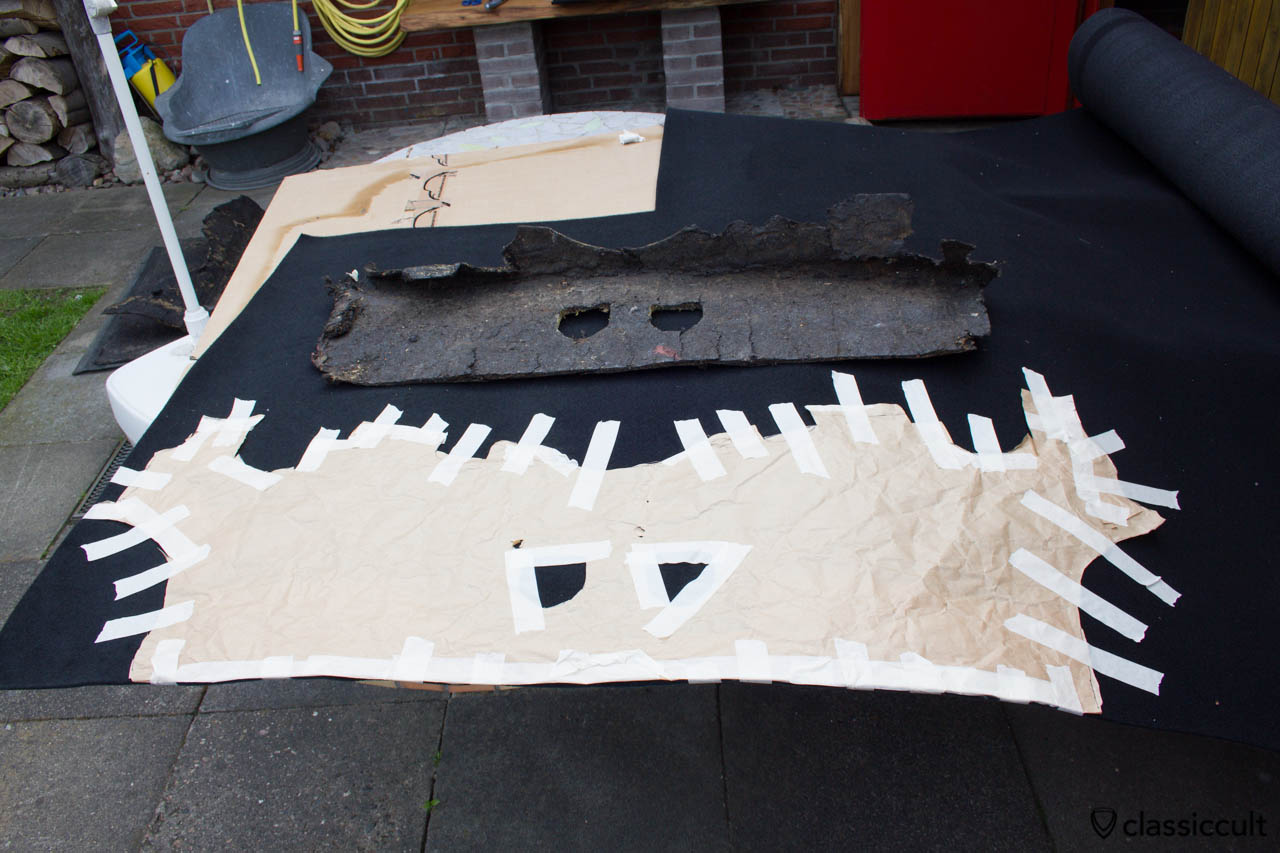
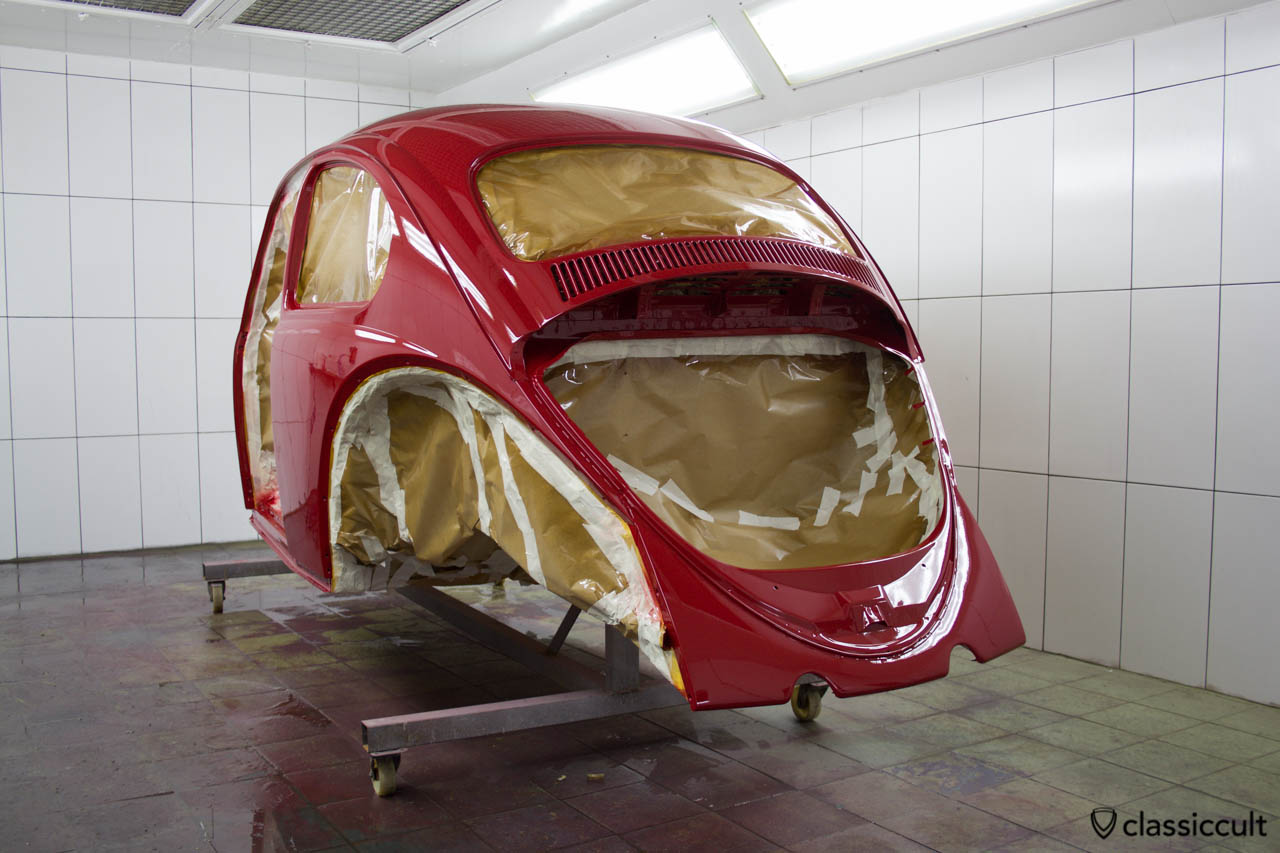
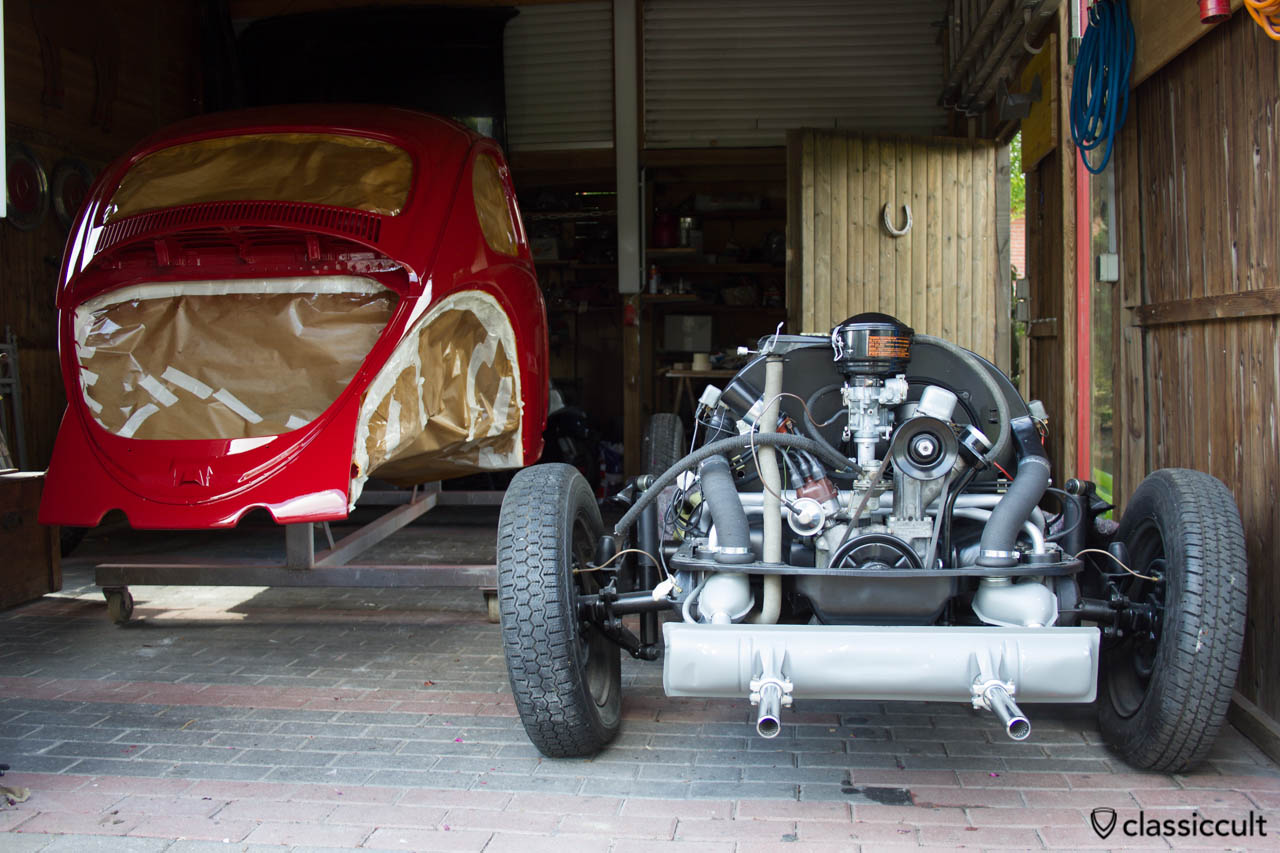
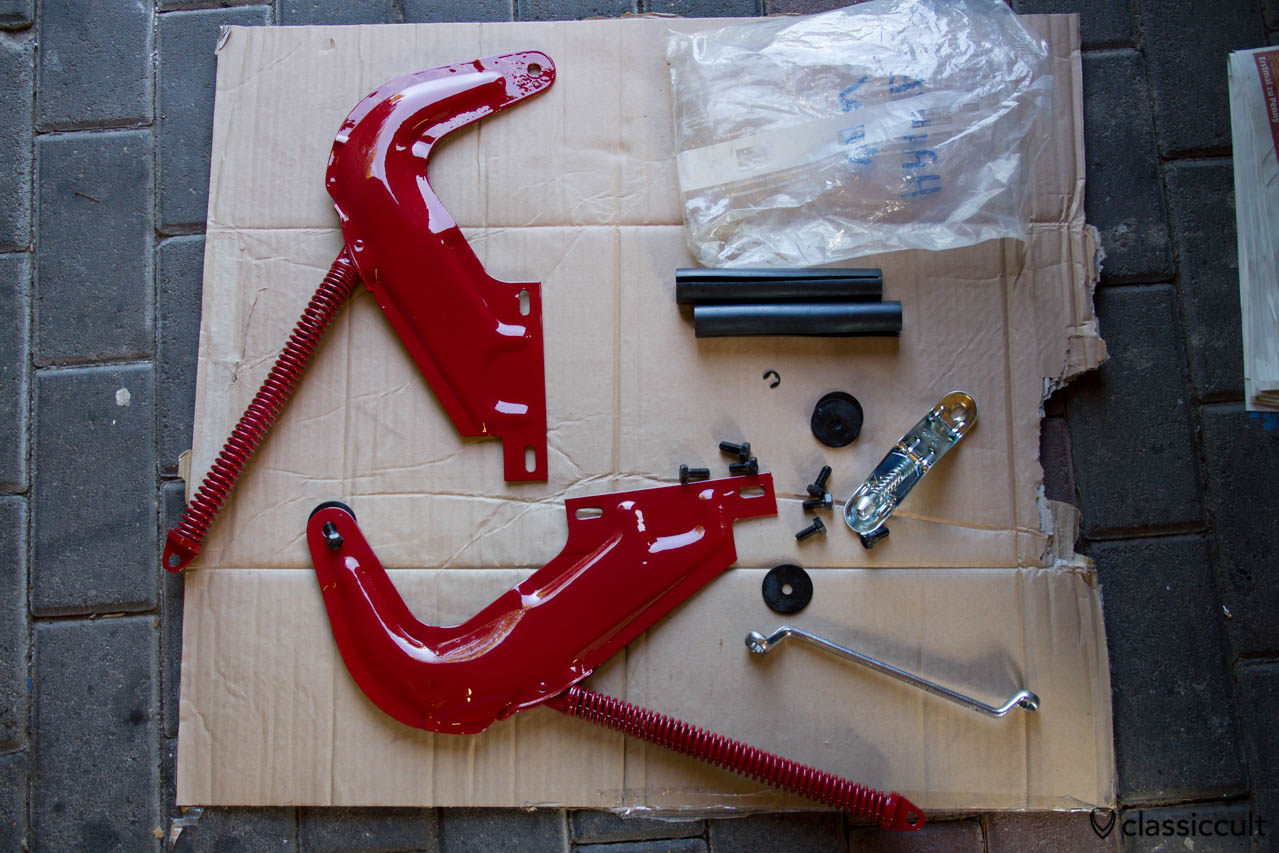
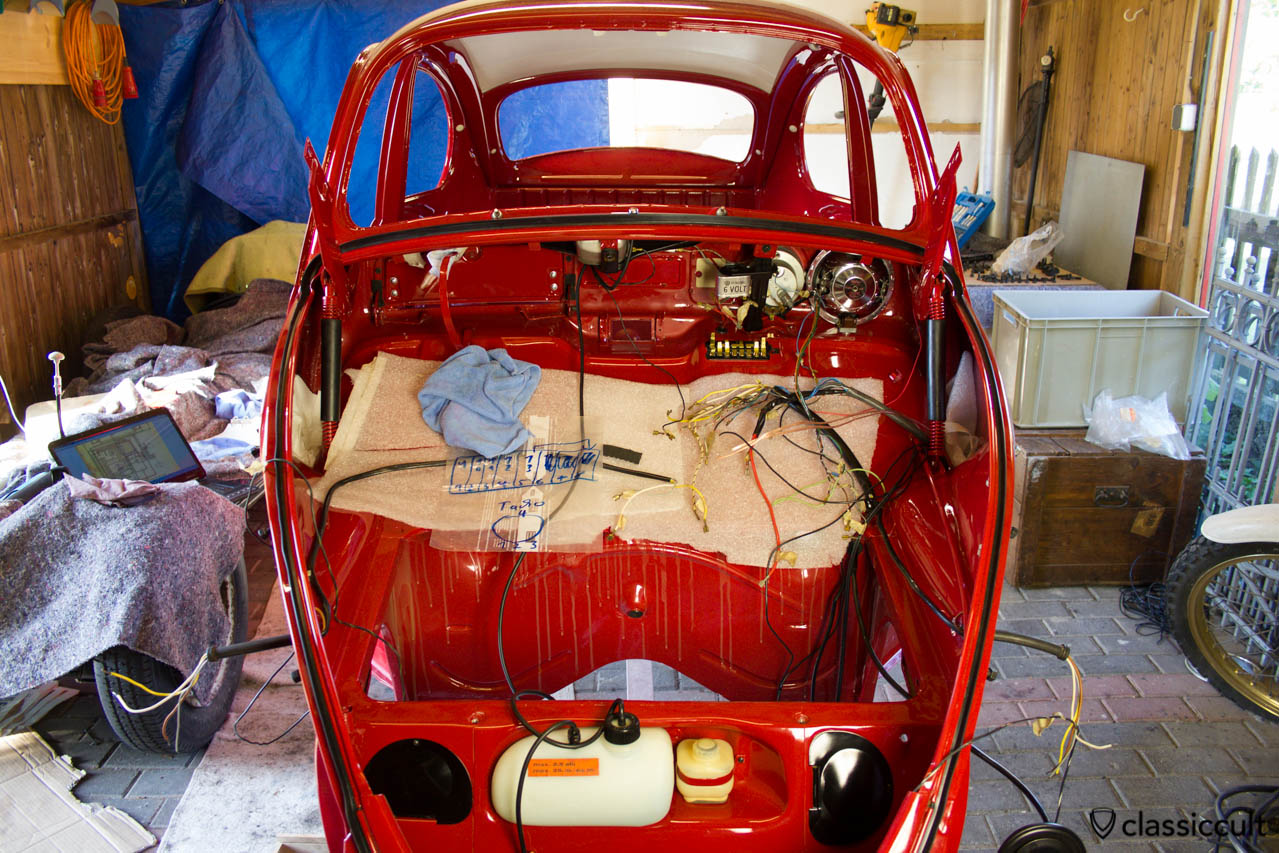
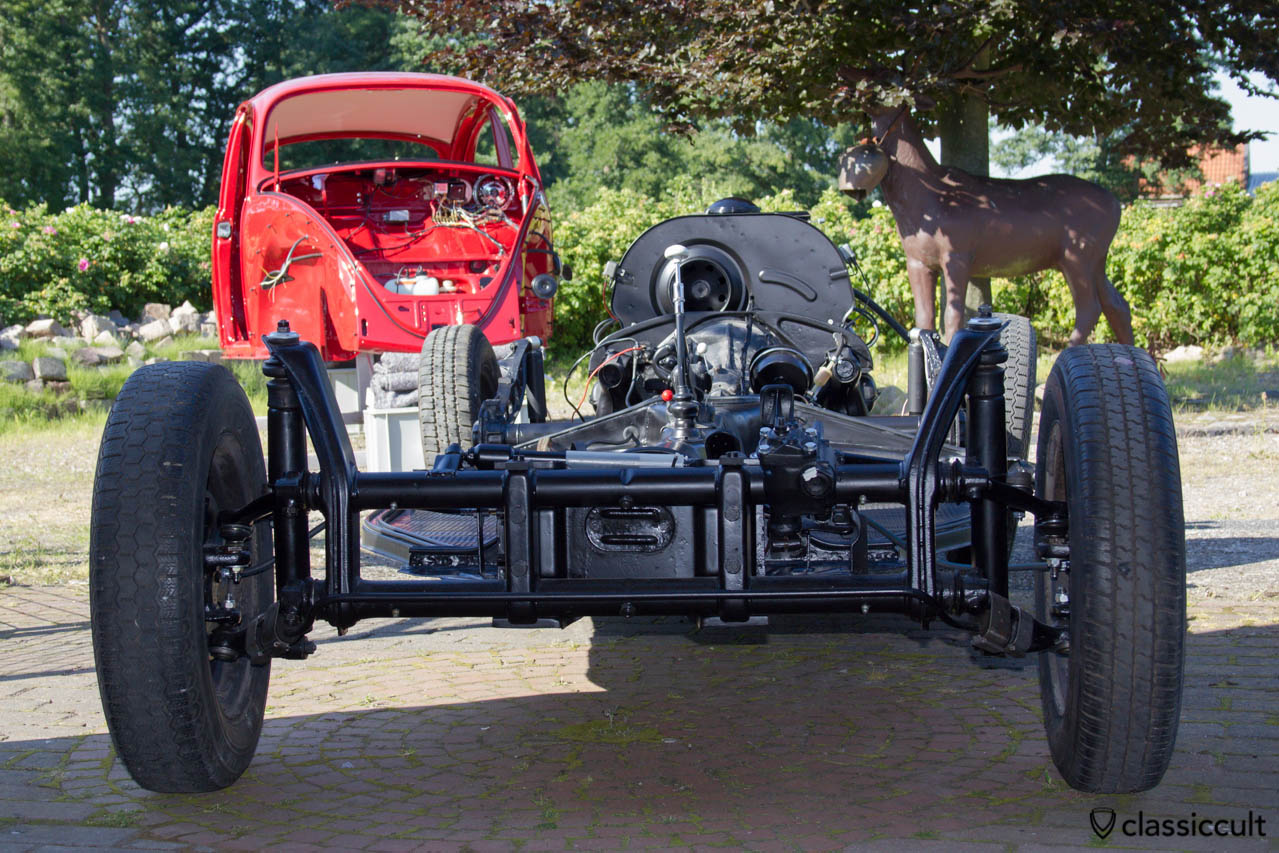
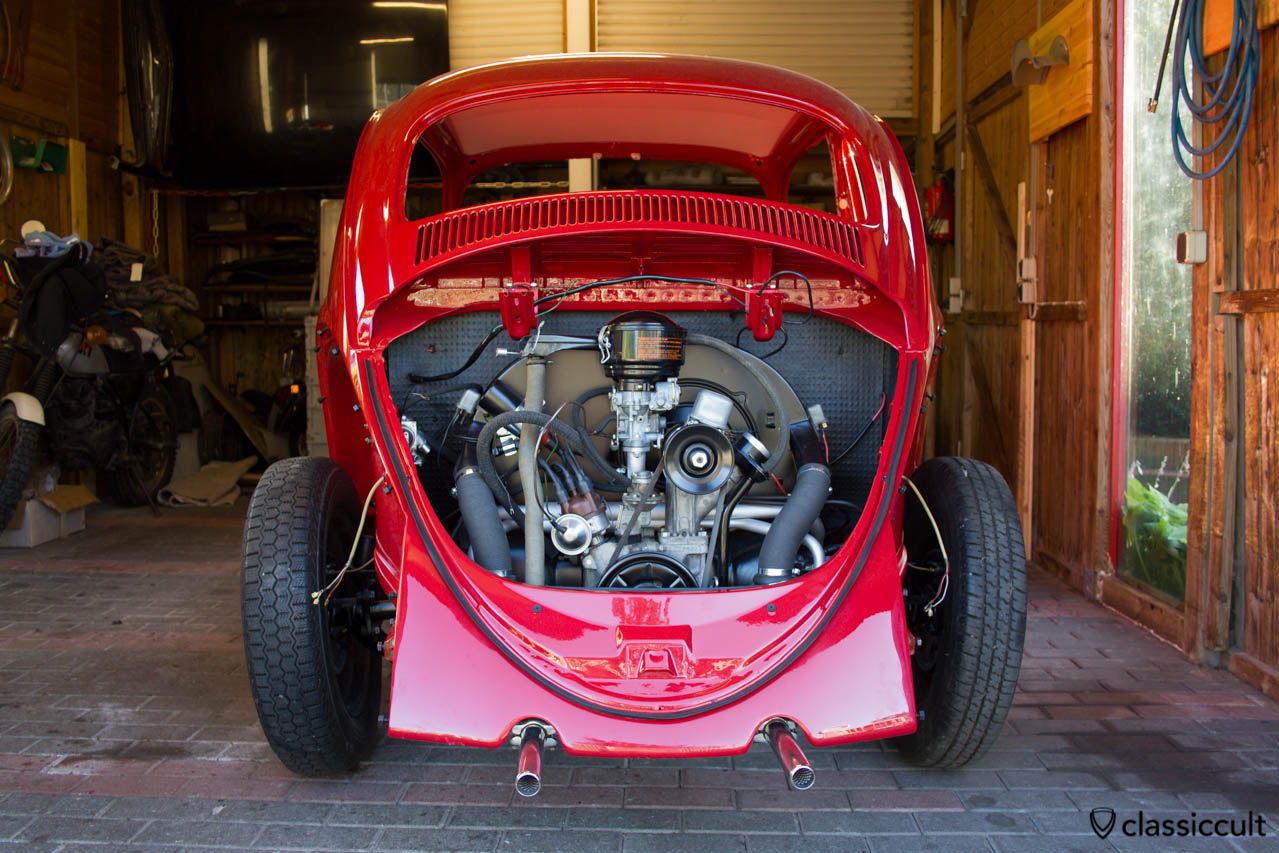
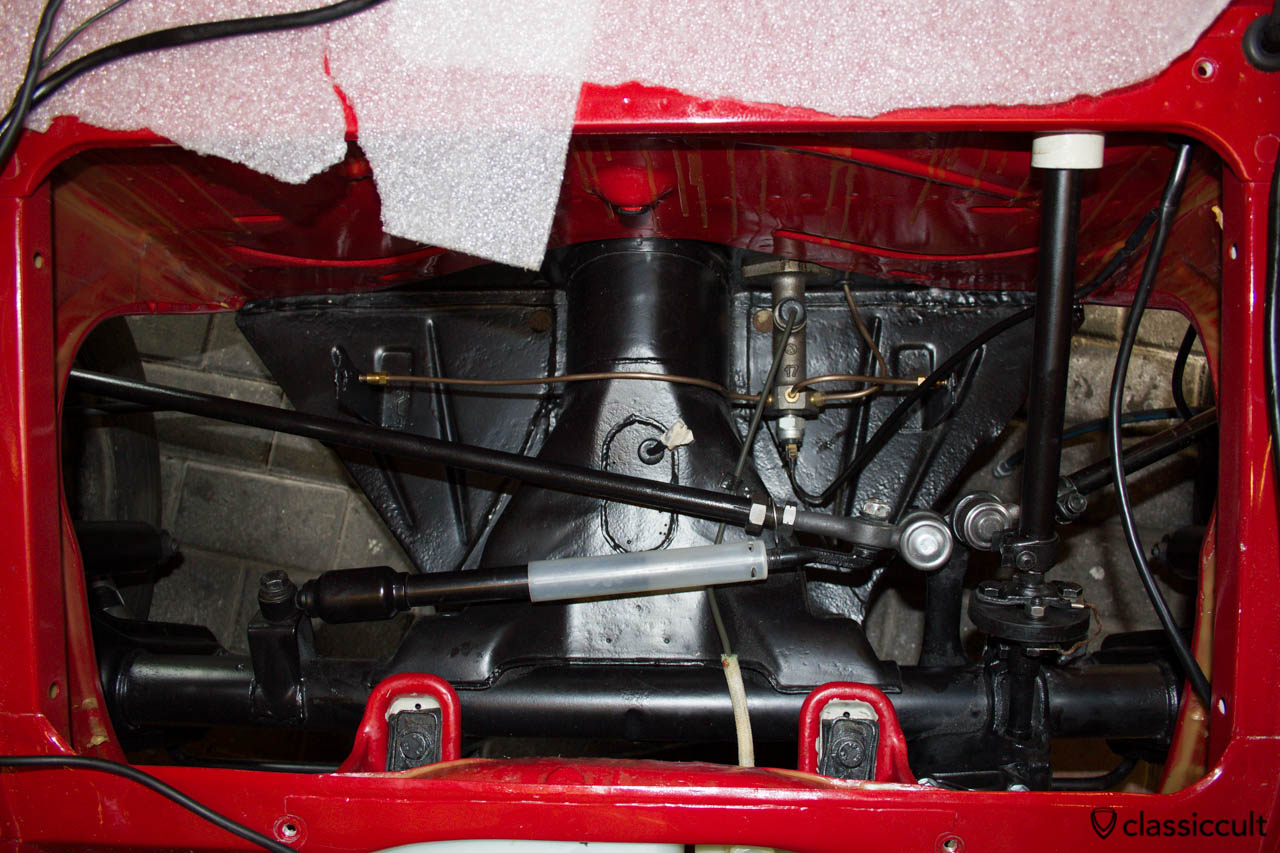
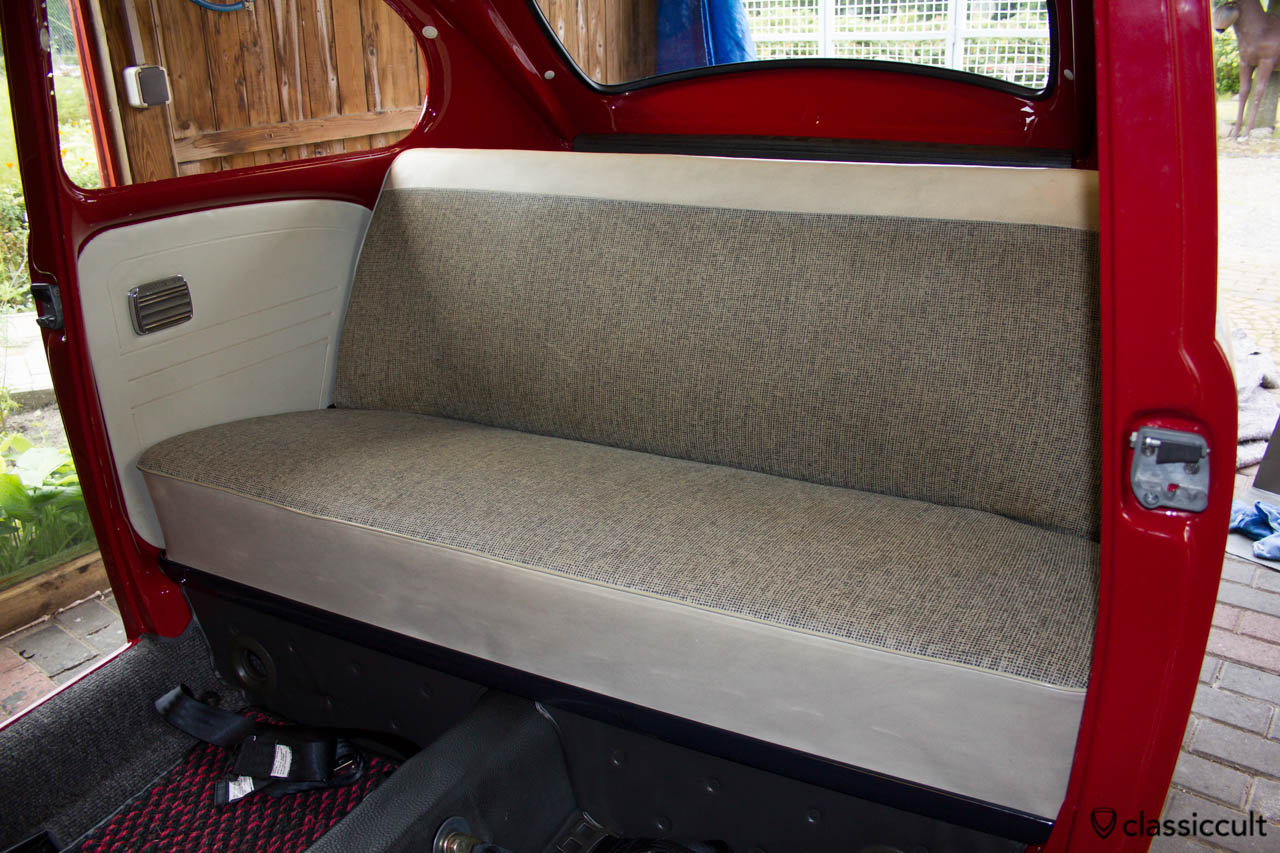
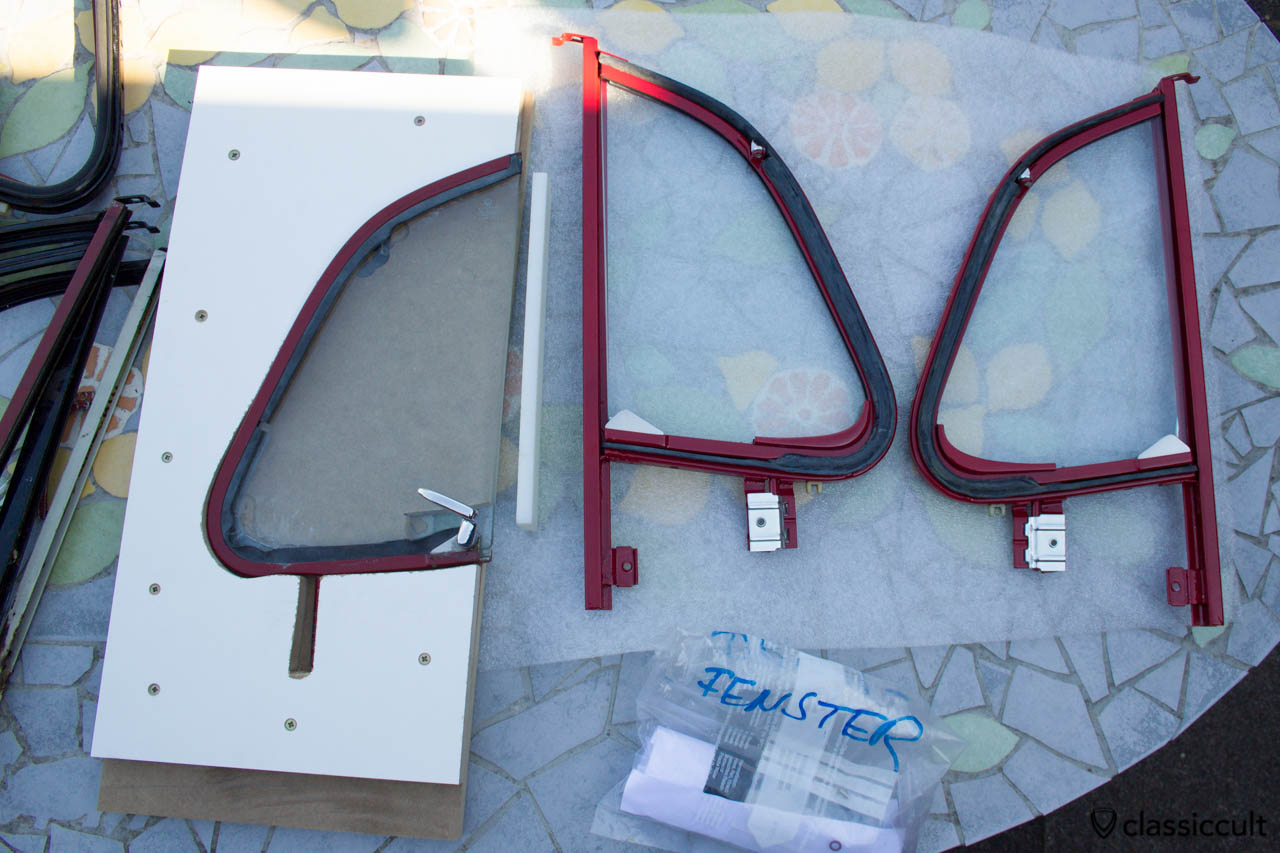
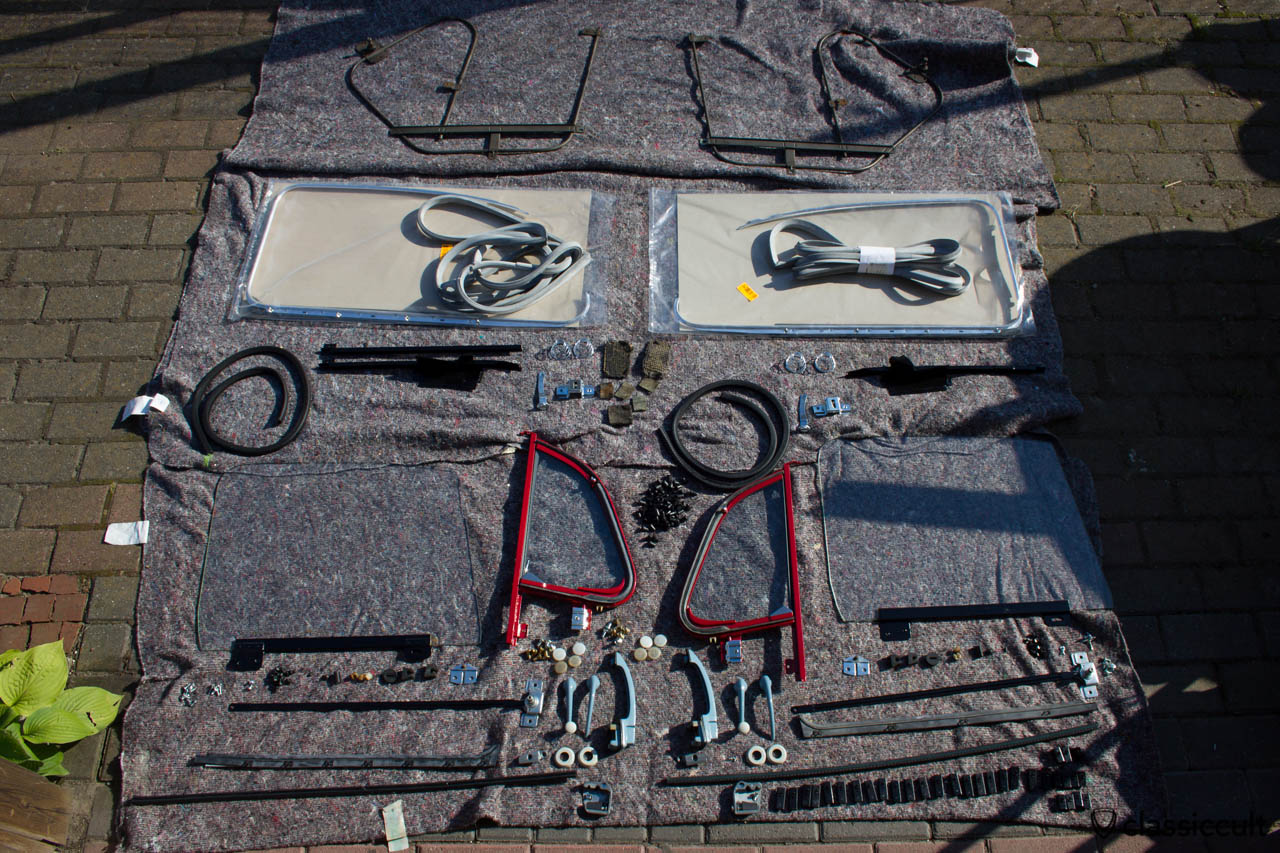
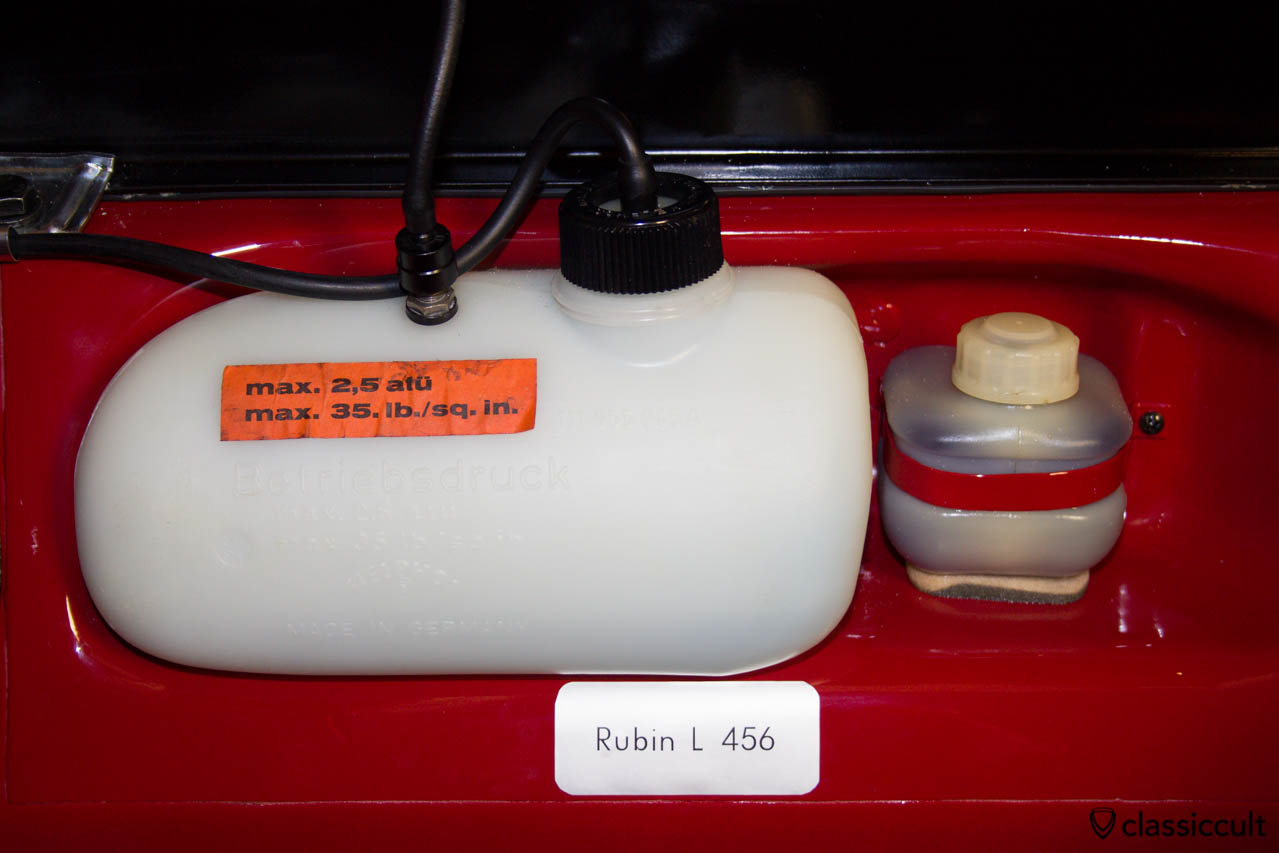
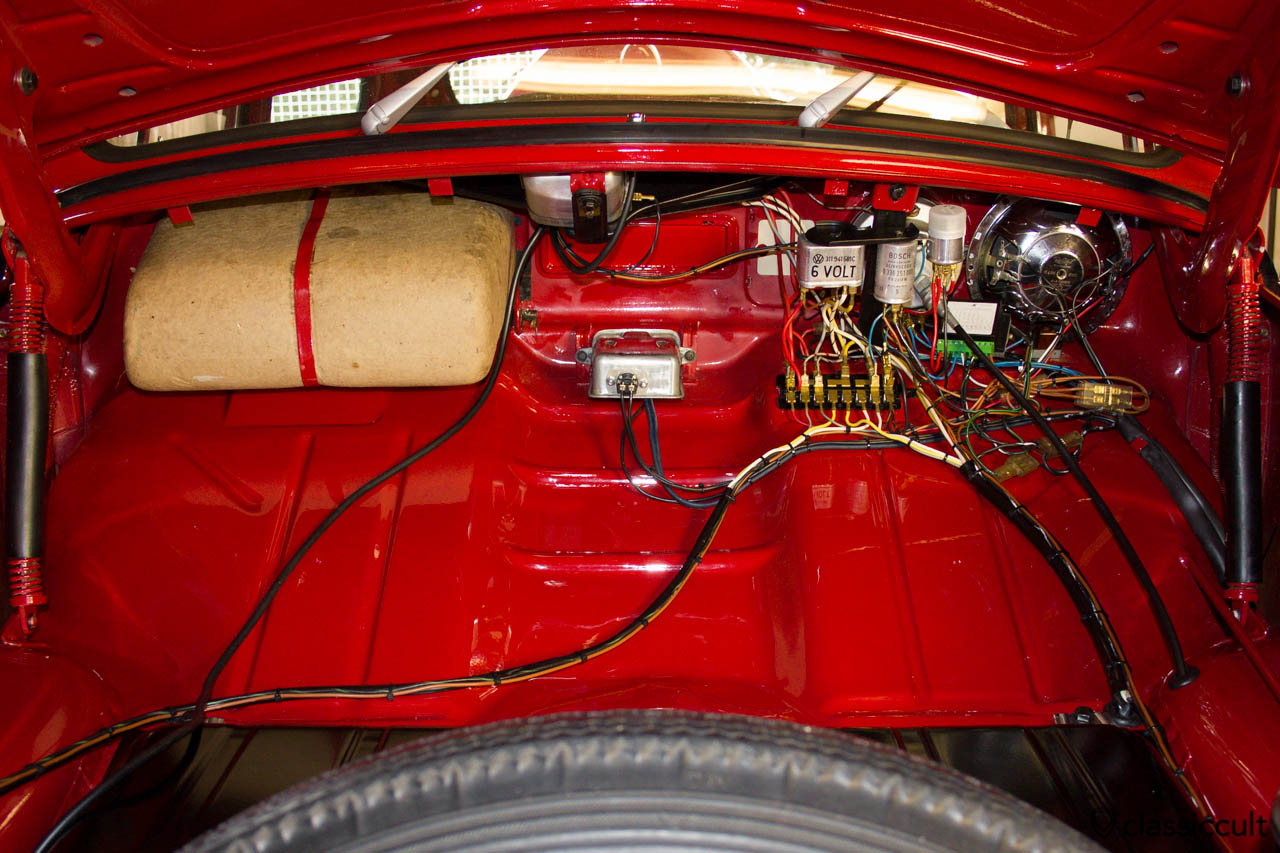
My VW Beetle 1200A inside before restoration1965 VW Beetle 1200A inside, original and unrestoredVW Beetle body removed from chassisVW Beetle restoration disassemblingVW motor and chassis parts ready for sandblasting and paintingVW Beetle vent window before restoration. I had to disassembly five vent windows to get a set of two with all parts good for restoration.VW Standard Beetle door handle and parts.The VW Beetle screw list. I wrote a list of all original screws, so I know which screw is for which part. How long is the screw? What is stamped on the screw head (e.g. KAMAX 50)? I also took a picture of all screws and parts. After that I put all screws in a box to get the old rusty screws new zinc plated in black and silver.VW Beetle restoration: screws restored and new galvanized. The screws are as original zinc plated in black and silver.VW Beetle restoration welding. At the picture you can see how a new front apron and spare wheel well repair panel was welded. Overall the entire bottom 20 cm had to be replaced on my VW 1200A Beetle.VW Beetle welding body with new Heater channelsVW Beetle restoration sandblasting. After the welding was finished, the next step was sandblasting. The VW Beetle body, the floor pan and all other parts were sandblasted and received a 2K epoxy primer.VW Beetle parts sandblasted. Front axle, tank and motor plates freshly sandblasted. All VW Beetle parts which are original black received epoxy primer and were painted black. All other parts, e.g. the body, fenders, doors and hubcaps received the first layer of filler after the epoxy primer.VW Beetle restoration fenders, doors and hood sandblasted and painted with epoxy primer.VW Beetle restoration chassis painted black.VW Bug front axle painted in black. VW 1200A Standard handles painted with epoxy primer and filler.VW 1200A parts with epoxy primer and filler. These parts will be painted in ruby red.VW 1200A parts with epoxy primer and filler. These parts will be painted in steel grey.VW Beetle parts restored and black painted. Some parts are duplicated, because I disassembly two VW 1200A Beetles.restored VW Beetle parts black paintedVW Beetle parts after resto. The big part is a Saxomat vacuum tank.VW Beetle restoration front axle and brake drums black painted.VW Bug motor paneling black painted.Primer at sheet metal overlaps of the VW Beetle. At the sheet metal overlaps the Volkswagen loves to rust. I put a lot of primer at all sheet overlaps with a brush and injection. This step is one of the most important steps in the restoration process. Better you look after that, rather than to trust that it will be done correct by a company. It takes about a day including body, doors and other parts. I recommend to do this as soon as possible after sandblasting and before the beetle moves to the painter.VW Beetle seam sealer sikaflex 221 sealant.VW Beetle tank very rusty insideVW Beetle tank restoration with a concrete mixer. I removed the rust in the VW Beetle tank with a concrete mixer. The tank is filled with screws and mounted at the concrete mixer. This tank restoration method is good to remove surface rust. I also put lots of degreasers in the tank to get it clean for the next step, the POR 15 treatment.VW Beetle tank restoration with POR-15 Fuel Tank Repair Kit. From the outside the tank was Sandblasted and painted. For the inside, I bought a POR 15 tank restoration set (for 80-90 Liter tanks) and in a second order more of the Metal Ready (3.7 Liter). The tank repair with POR 15 worked out very well. If the tank is very rusty, you need a lot of Metal Ready. As more as better. After the inside restoration, the tank was painted again from the outside.Bondo on original VW Beetle fender, ready for the last layer of filler.VW Beetle fenders and doors painted with filler. Ready for wet sanding.Ruby red parts for the VW 1200 A Bug fresh painted.VW Bug door painted in ruby red.Steel Grey parts for the VW 1200 A Bug fresh painted.VW Beetle restoration: wheel painted in pearl white L87 and black L41.VW Beetle shock absorber getting primer and black painted. The front shock absorber was new old stock and the rear was new. The original primer and color at the shock absorber will rust very quickly and I do not like that…Restored parts of the VW Bug jack after resto zinc plated in black and silver. The head of the jack is painted in ruby but the original color is blue. This was the first part which I had assembled.VW Beetle restoration floor pan corrosion protection with Mike Sanders rust prevention grease. Goodbye rust!Mike Sanders grease needs to be heated and then it can be sprayed in the VW Bug frame tunnel and heater channel with a special special spraygun.Restored zinc plated brake parts for the VW Beetle. The brake master cylinder is new old stock.VW Beetle restoration assembling the floor pan with restored, nos and new parts.VW Beetle motor and gear box mounted at the chassis.Making a VW Beetle floor carpet template.VW 1200A Standard Beetle floor mats.VW Beetle restoration floor pan. Restoration of the VW Beetle floor pan completed. Front axle, motor, gear box, brakes, pedal and all other parts mounted. The floor pan seal is fixed with Sikaflex 221. I did not use the nails.original VW 1200 A Standard Beetle hardboard trunk linerVW 1200A Hardboard trunk liner resto step 1. I put a few layers of newspaper peace’s with spray adhesive at the cracks of both sides of the hardboard trunk liner.VW 1200 A Hardboard trunk liner resto step 2. I used spray adhesive to put wool felt on both sides of the hardboard trunk liner.Car carpet for inside, e.g. behind the rear seat floor pan. The carpet is not visible and can be removed easy. It is the first layer on the metal to protect the color and to keep a bit the noise off.VW Beetle restoration body painted in ruby L456.VW 1200A body fresh painted and back home.VW Bug 1200A body in ruby red L456VW Bug in packaging film getting Mike Sanders rust prevention grease. I put Mike Sanders corrosion protection in the heater channels and in the areas where the beetles tend to rust.VW 1200A Standard Beetle Headliner installation. The Standard beetle has a very simple headliner. It is possible to install the headliner in a Standard beetle by yourself. The first step is to mount the felt with spray adhesive.VW Standard Beetle Headliner installation. The next step is to put the headliner with the original rods in place. Start at the rear and work forward. You need lots of power to get the headliner in place.VW Beetle restoration headliner. I bought the headliner, felt, spray adhesive and carpet for my VW 1200 A from Peter Theobold aka Monsterbacke, see decohaus.de. Peter can give you advice how to install the headliner. Also the necessary headliner installation tool was included. I would give 100 of 100 points for the Headliner from Monsterbacke.VW Beetle hood hinges restored and ready do mount.VW Beetle restoration wiring the original harness. I did as much as possible of the wiring before the hood, tank and floor pan was mounted. On my first beetle restoration I mounted the floor pan and hood before I did the wiring and it was much more exhausting for my back. I would recommend to do the wiring first. It is very comfortable to stand at the place where the tank goes in and do the wiring.VW Beetle engine compartment firewall with original insulation tarboard. On the left side of the firewall is a Saxomat part mounted.VW Beetle restoration: floor pan ready to get toegher with the body.VW 1200A Bug floor pan and body together after resto. Called HOCHZEIT in Germany.VW Beetle restoration steering. I bought the steering damper from Volkswagen Classic Parts at the Maikäfertreffen meeting in Hannover. I do not know what the ugly plastic cover has to do there. It wobbles and clatters and makes very annoying driving noises. Who needs original Volkswagen Classic Parts reproductions parts like that? I removed it after the first few kilometers.VW Standard Beetle interior parts.VW 1200 A luggage area with cardboard. Only the Standard VW Beetle has cardboard in the luggage area. The Export Beetle has luxury carpet.VW 1200A rear seatVW Beetle vent window restoration press device. I build a VW Beetle vent window press device to get the window with sealing back in the frame. Because the VW 1200A has the vent windows painted in body color you have to be very carefully. I tested the press function with used parts. After the window is back in the frame, the sealing needs to be cut off. BTW, the restoration of chrome vent windows is easier.VW Beetle door parts. There are lots of parts in the Beetle doors. I have already disassembled the doors a few times and it is always a big adventure to put the door together.VW Beetle door after a full restoration. I put Mike Sanders rust prevention grease at the inside of the door.Volkswagen Rubin L 456 paint code sticker repro. Before restoration, I took detail pictures of the original Rubin L 456 decal and the measurements. Then I redesigned the sticker with the computer. I do not know which font Volkswagen used so I choose a font which matches as close as possible. I then broke the text apart and changed the design of the letters and numbers till it was happy. At the end, I printed it with a Laser printer on aluminum paper “conrad.de Artikelnummer 532568”.VW Beetle 1200 A fuse box and wiring.My 1965 1200 A VW Beetle after restoration, more pics and details after resto
WOW, I love what you did. I have been able to restore 2 VW so far. A 1972 and a 1964. I have a 1974 now that doesn't require much and I want to keep it simple, but the 64 needs a new engine and some TLC after my nephew took it for a joy ride. I was wondering if you can take that job on and how much would it be. thanks
Looks great I recently bought a 1956 vw beetle rag top it's currently red but originally horizon blue the red looks great but it's not original your beetle looks so cool I wonder if I should leave it red
Its really awesome you did to yr bug.....how many working hours were put in to restore the lovely bug? Was it easy to get quality parts? I started my restoration in 2012 on my bug but stopped ....time n money constraint....im excited again to restart my project....
thank u..
johnston
Malaysia..
Hello Johnston from Malaysia. I collected parts for a few years and had the hard to get parts before I started. It takes a lot of time to get everything restored and together. A few hundred hours. Good luck, Lutz
Hello, I am Ravi from New Delhi in India. I am in the process of restoring by 69 Beetle which is badly rusted. It was lovely to read your post and I can surely pick up several tips from here. Congrats on a really wonderful restoration. Cheers
one of my favorite car. I have 1965 manufactured 6 sri 0931 car. should resorted. we used it as our homecoming function car! you had a good job in the name of Volkswagen.
I just purchased a 1965 standard bug and I am about to "Pop The Top" and restro my bug. My bug came in Sea Blue. Someone painted it in some nasty blue and she's going back to Sea Blue 66. This car is the first one i'm excited about tearing into it. If you could give me any more details on how you tore it down it would be greatly appreciated. I have to put a new front clip on just like you did. Well thanks for all the info you posted and pics I'm sure we all appreciate it alot.
Thanks for your post in my blog. I wish you good luck with the restoration of your Beetle.
I can recommend that you take lots of pictures when you take the parts off, then it is easy to put together. If you do not do this, you have to read and google more at the end.
What a wonderful, inspiring job you did.
Here in South Africa it is a lot more difficult to be able to obtain absolutely brand new and original parts for Beetle restorations.
Please could you forward me a list of places where our fanatic Beetle lovers can order parts from.
Many thanks once again for a superb job. You made us all proud.
Matthys Moss
Dear classiccult, I have owned my 1965 Type 111 A sedan since 1968. The car was built mid January 1965. 1964 111 marks the last year they were called standards. 1965 111's were called Type A sedans only in that year, 1966 and afterwards they are called 1200 A. 1965 A sedans were the last year to use button type body pan, meaning the floor mats ( 4 ) snap onto buttons welded into the pan. The pan is unique because it is the last year that uses the stud in the pan with a claw and wing-nut to hold the front seats into place, in other words NO seat tracks. 1965 A sedan is also the last year to use the old style ( Franz Reimspiess design 1937 ) engine case. The engine is a 1200 36hp with fresh air heater system. My engine is numbers matched to the car and confirmed by Wolfsburg. There is no doubt your car is a standard model, however your car is built like a German 1966 1200A, with seat tracks, new style mats and a 1200 40hp What is your production date? have you ever seen a 1200 1965 fresh air 36HP? have a look;
http://images.thesamba.com/vw/gallery/pix/516081.jpg
Hi Don, thanks for the detailed information. Yes you are 100% right. My 1200A is made in 12/1965 and a 1966 1200A. These are the papers of my Beetle
Greetings, Lutz
Hi Keith,
I used mipa-paints.com. Silver beige L466 and grey black L43 was scanned from original color because it was not in the Mipa-System. I have the code now.
Greetings
Lutz
Beautiful labor of love on your 1200 A. Pretty surprised to see the Sachsomat stuff on such an early car. We (my father and I) used to service a couple of type 1s, (auto-sticks) I wanna say 1968s or 9s in the early '80s. We hated them, they just killed what ever fun that could be derived from driving a bug. That said, I love that you kept yours as ordered. I assume this Sachsomat apparatus came from Wolfsburg and wasn't dealer installed. It seems to me, counter intuitive that a 1200 A would come all duded up with a fancy ohne Kuplung option.
Cheers
Bernard
Hello Bernard, I bought my Saxomat VW from the first owner. The first owner had only one leg when he ordered the VW in 1965. This is the invoice and VW put the Saxomat in the car in the factory. Greetings
Lutz
Hi! I recently bought a VW Beetle 1965 1600 cc. The engine is in running condition but the car is very badly rusted! I don't know where to start from! The restorers ask for ten lacs whereas I can buy a car in good running condition for five lacs. This is my passion and also want to make the trading of these beauties my business. Pl advice thnx
Hello Neeraj, yes that’s true. They run and run and run but they do rust. In most cases it is much more expensive to do a restoration compared to buy a good car. So it is up to you if you spend lots of time and money and do the resto or take it easy and buy another VW instead in better condition. Either way I with you good luck. Lutz
Hi, a fantastic effort well done, the car looks splendid. I have a 1966 Beetle 1300, built here in Australia, in Clayton, Melbourne, all original engine and gearbox. I've reupholstered the seats and installed a new headliner. There's absolutely no rust in it, and I love driving it around. I was going through this site when I saw your trunk liner resto, great idea so today I'm in the shed glueing newspaper over all the cracks like you did on the trunk liner. I'll try to find some felt as I think that's a good idea also. I hope your car is still going strong for many years to come, just lovely to see so much effort in a restoration of these fine cars.
Regards Frank
Hello Frank, thanks for your comment. Yes sure I still drive with my 65. It is always good to repair the parts like the trunk liner. New repro is often boring. Have fun with your 66, Lutz


thank u..
johnston
Malaysia..
I just purchased a 1965 standard bug and I am about to "Pop The Top" and restro my bug. My bug came in Sea Blue. Someone painted it in some nasty blue and she's going back to Sea Blue 66. This car is the first one i'm excited about tearing into it. If you could give me any more details on how you tore it down it would be greatly appreciated. I have to put a new front clip on just like you did. Well thanks for all the info you posted and pics I'm sure we all appreciate it alot.
Thanks for your post in my blog. I wish you good luck with the restoration of your Beetle.
I can recommend that you take lots of pictures when you take the parts off, then it is easy to put together. If you do not do this, you have to read and google more at the end.
Best regards,
Lutz
Here in South Africa it is a lot more difficult to be able to obtain absolutely brand new and original parts for Beetle restorations.
Please could you forward me a list of places where our fanatic Beetle lovers can order parts from.
Many thanks once again for a superb job. You made us all proud.
Matthys Moss
http://images.thesamba.com/vw/gallery/pix/516081.jpg
Greetings, Lutz
i start to restore my 1966 1200A this year. Can you tell me where you get this seat covers from? Is this from TMI?
Thanky you
Thx, K
I used mipa-paints.com. Silver beige L466 and grey black L43 was scanned from original color because it was not in the Mipa-System. I have the code now.
Greetings
Lutz
Cheers
Bernard
Lutz
Regards Frank